

SPECIFICATION
Body
- Body: Alder – 2 piece
- Body Shape: “Pre-’68” Vintage Telecaster
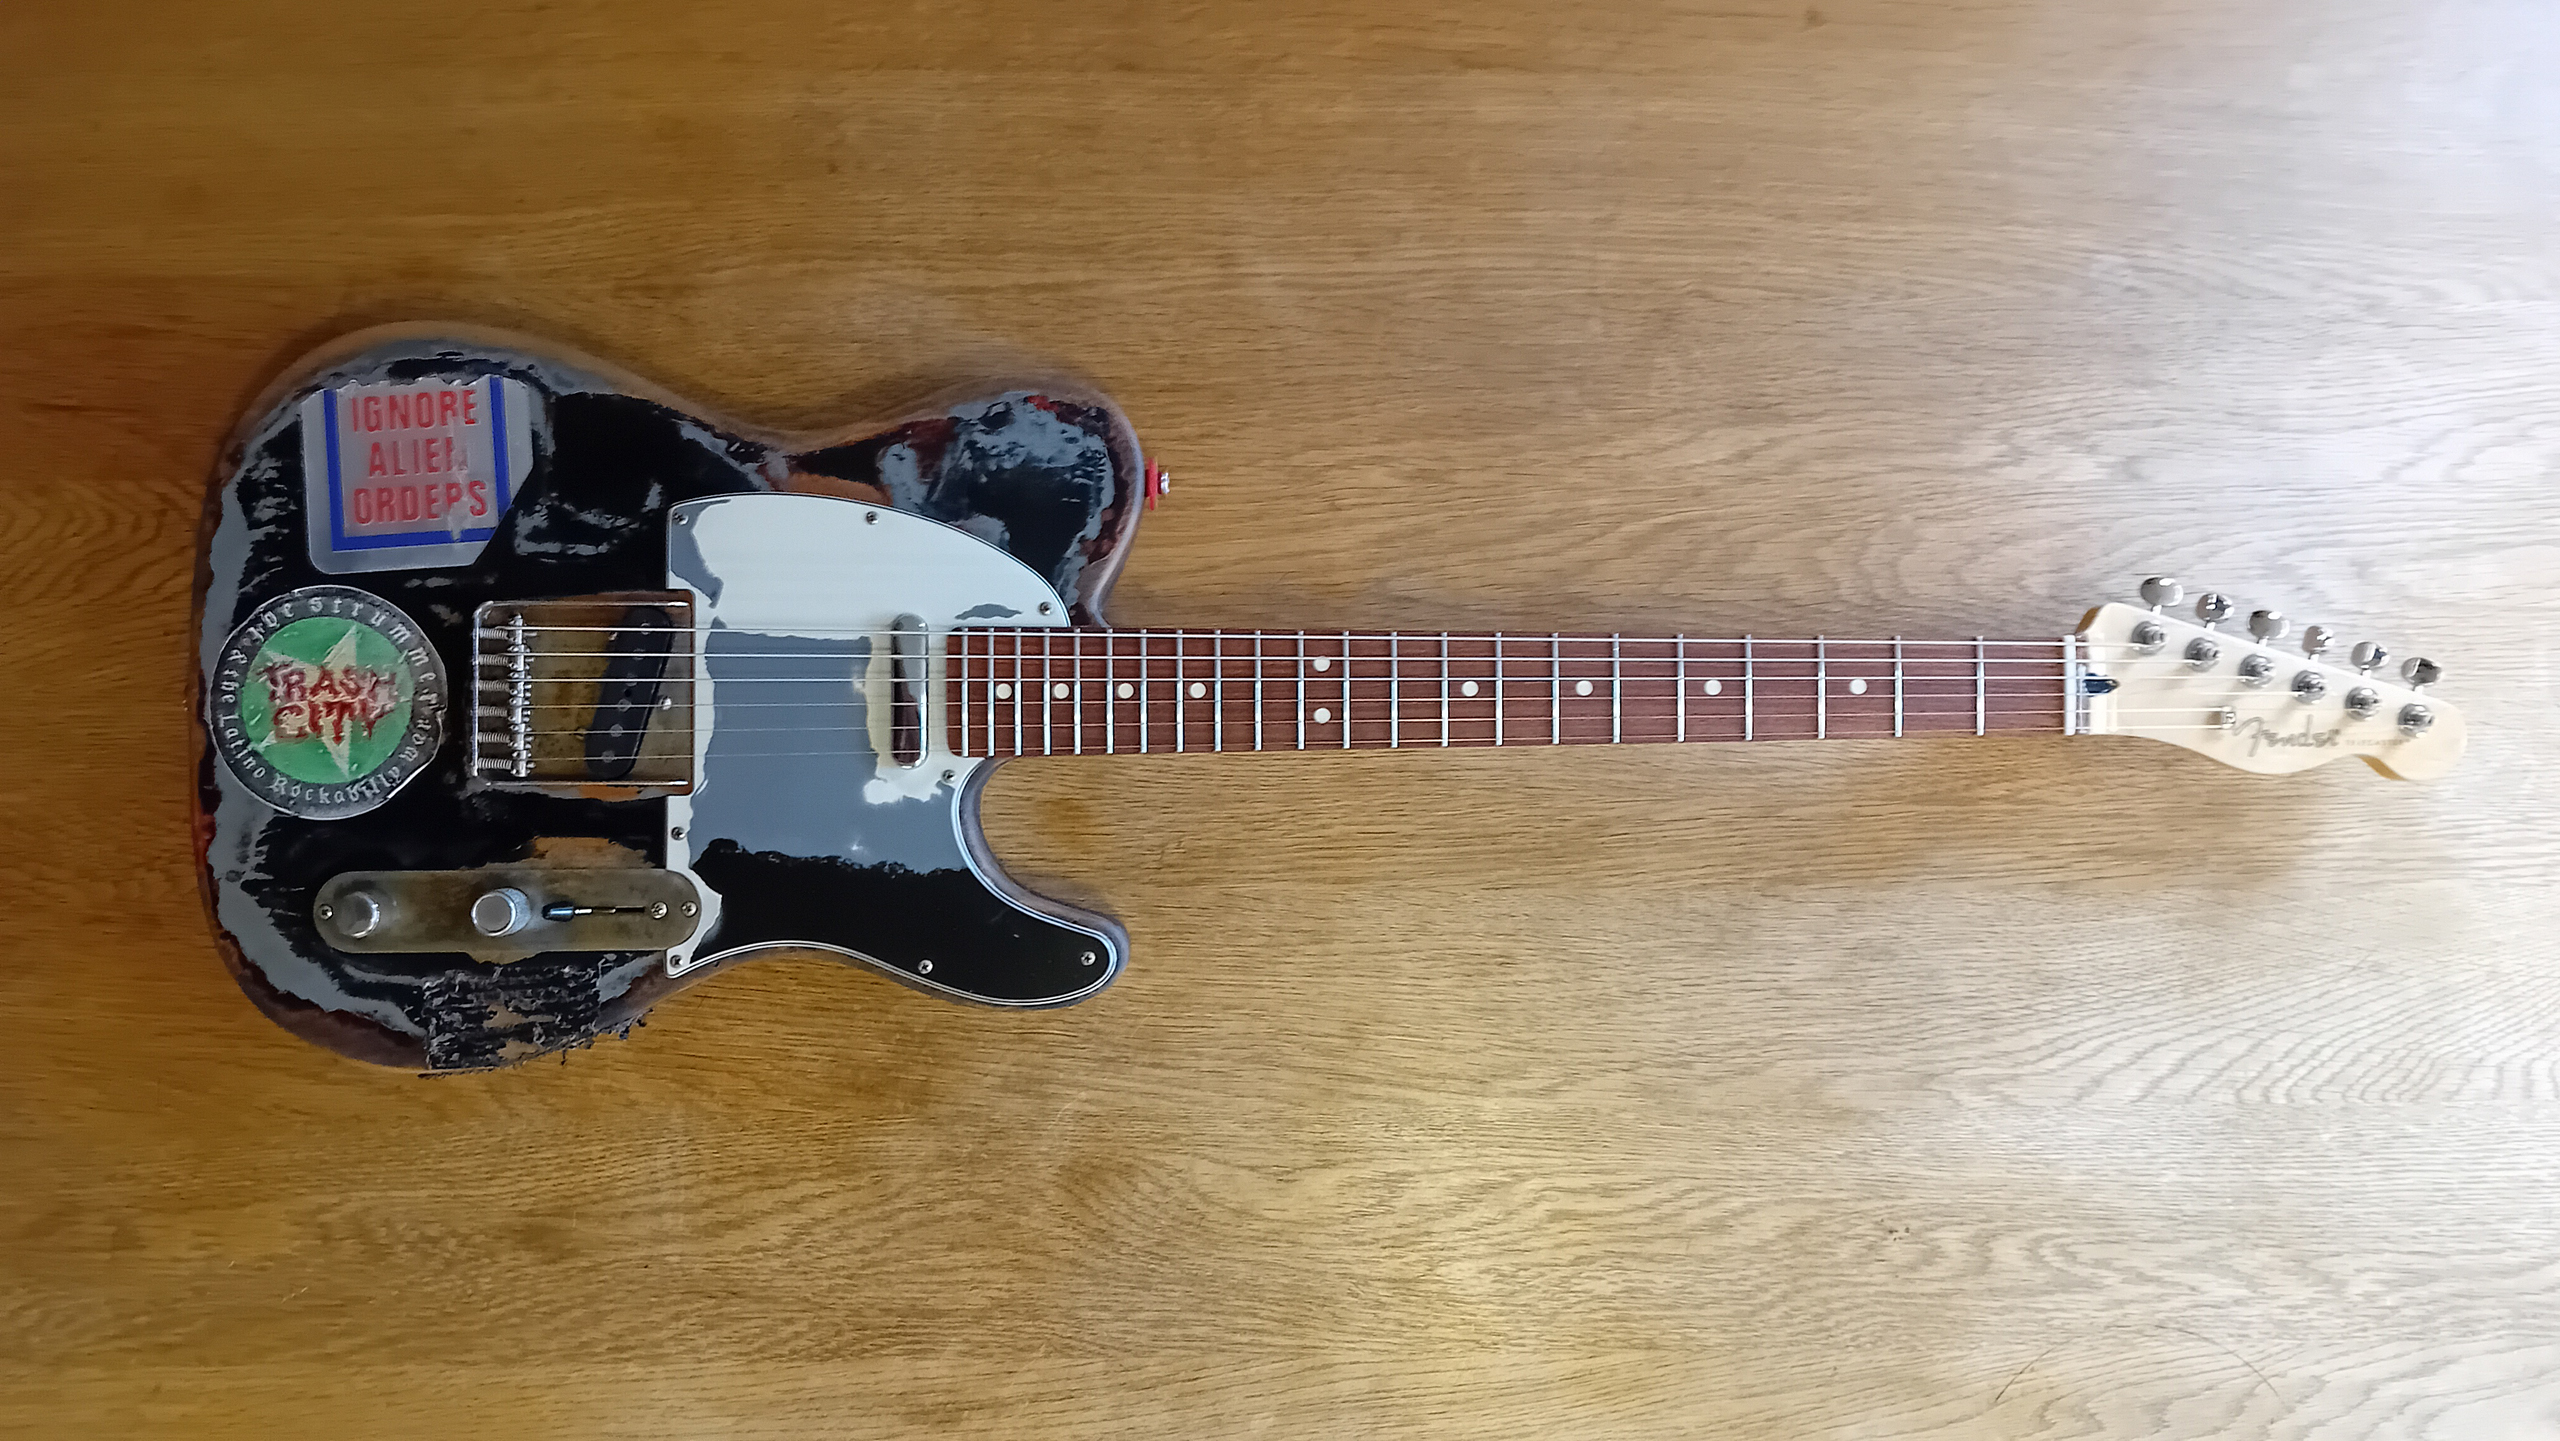
- Body Finish: “Joe Strummer Relic Telecaster” by oldskoolrelicscustomshop – Black and grey over vintage sunburst. Nitro – distressed, with applied stickers. Additional detail relicing, here at Garageland – with replacement, (correct), metallic foil “Ignore Alien Orders” sticker, and retro-fitted “Trash City” roundel – (both by AxeTremeCreations Custom Shop).
Neck
- Neck Type: 2021 Fender Player Telecaster, 9.5″ Radius, Modern “C” profile
- Tuner Opening Diameter: 10mm
- Number of Frets: 22
- Fret Size: Medium Jumbo
- Position Inlays: White dot
- Fretboard Radius: 9.5″
- Fretboard: Pau Ferro
- Neck Material: 1 piece maple
- Neck Finish: Satin Urethane Finish on Back, Gloss Urethane Finish on Front
- Nut Width: 1.650” (42 mm)
- Scale Length: 25.5″ (64.8 cm)
- Neck Relief: 0.010″ (0.25mm)
- Strings – Elixir NanoWeb 10-52 Set, Nickel wound. 12077 – .010, .013, .017, .032w, .042w, .052w
- String Action at 17th Fret: Treble Side – 5/64″ (1.7mm), Bass side – 5/64″ (1.7mm)
- Neck Plate: Genuine Fender “F’ – 4 Bolt, Chrome Neckplate – custom reliced
Electronics
- Pickup Configuration: S/S
- Body Shielding: Heavy grade, copper sheet, with conductive adhesive backing
- Bridge Pickup: Fender Custom Shop “Twisted Tele” Telecaster neck pickup, AlNiCo V, 5.9K
- Neck Pickup: Fender Custom Shop “NoCaster ’51” Telecaster neck pickup, AlNiCo III, 7.18K
- Pickup Switching: Fender “Baja”, 4-way schematic, with Fender S-1 control switch, offering series/parallel phase switching. Oak Grigsby 4 way, spring action, pickup selector switch. (S-1 switch Up/Off): Position 1. Bridge Pickup, Position 2. Bridge and Neck Pickups (Parallel), Position 3. Neck Pickup, Position 4. Neck and Bridge Pickups (Series). (S-1 switch Down/On): Position 1. Bridge Pickup, Position 2. Bridge and Neck Pickups (Parallel), Out of Phase, Position 3. Neck Pickup, Position 4. Neck and Bridge Pickups (Series), Out of Phase.
- Controls: Master Volume, (Fender S-1), Tone.
- Jack Socket: PureTone Mono socket
- Potentiometers: 1 x Fender S-1, 250k. 1 x CTS, 250k. (“True vintage” audio taper).
- Capacitors: 1 x 0.047µF 100v Cornell Dubillier “Orange drop” ceramic capacitor
- Wiring: Fender stock plastic wiring, with additional, 22 gauge, “Gavitt” cloth covered wire. Local heat-shrink protection/isolation at circuit terminals.
Hardware
- Hardware: Nickel/Chrome
- Tuners: Fender “Classic Gear” Kluson style tuners. (Modern, 10mm, two-pin fitting).
- String Tree: 1 x Fender “Pure Vintage” with nylon tubular spacer
- Bridge: Genuine Fender, six saddle, Telecaster bridge plate assembly – custom reliced
- Jack Plate: Custom reliced, reinforced patch plate type
- Control knobs: 1 x Fender S-1 knob, complete assembly – Chrome, reliced, 1 x Fender “Flat Top” Telecaster/Precision Control knob – Chrome, reliced.
- String Nut: Slotted, shaped and polished bone
- Switch Tip: Black plastic, Stratocaster style switch tip
- Scratchplate: Vintage white, 3-ply (VW-B-VW) – Custom painted and reliced by oldskoolrelicscustomshop. With additional detail relicing, here at garageland.
- Screw set: Various – reliced
- Strap Buttons: Fender “Road Worn” Vintage style buttons, with black felt washers and red “Grolsch-style” straplocks
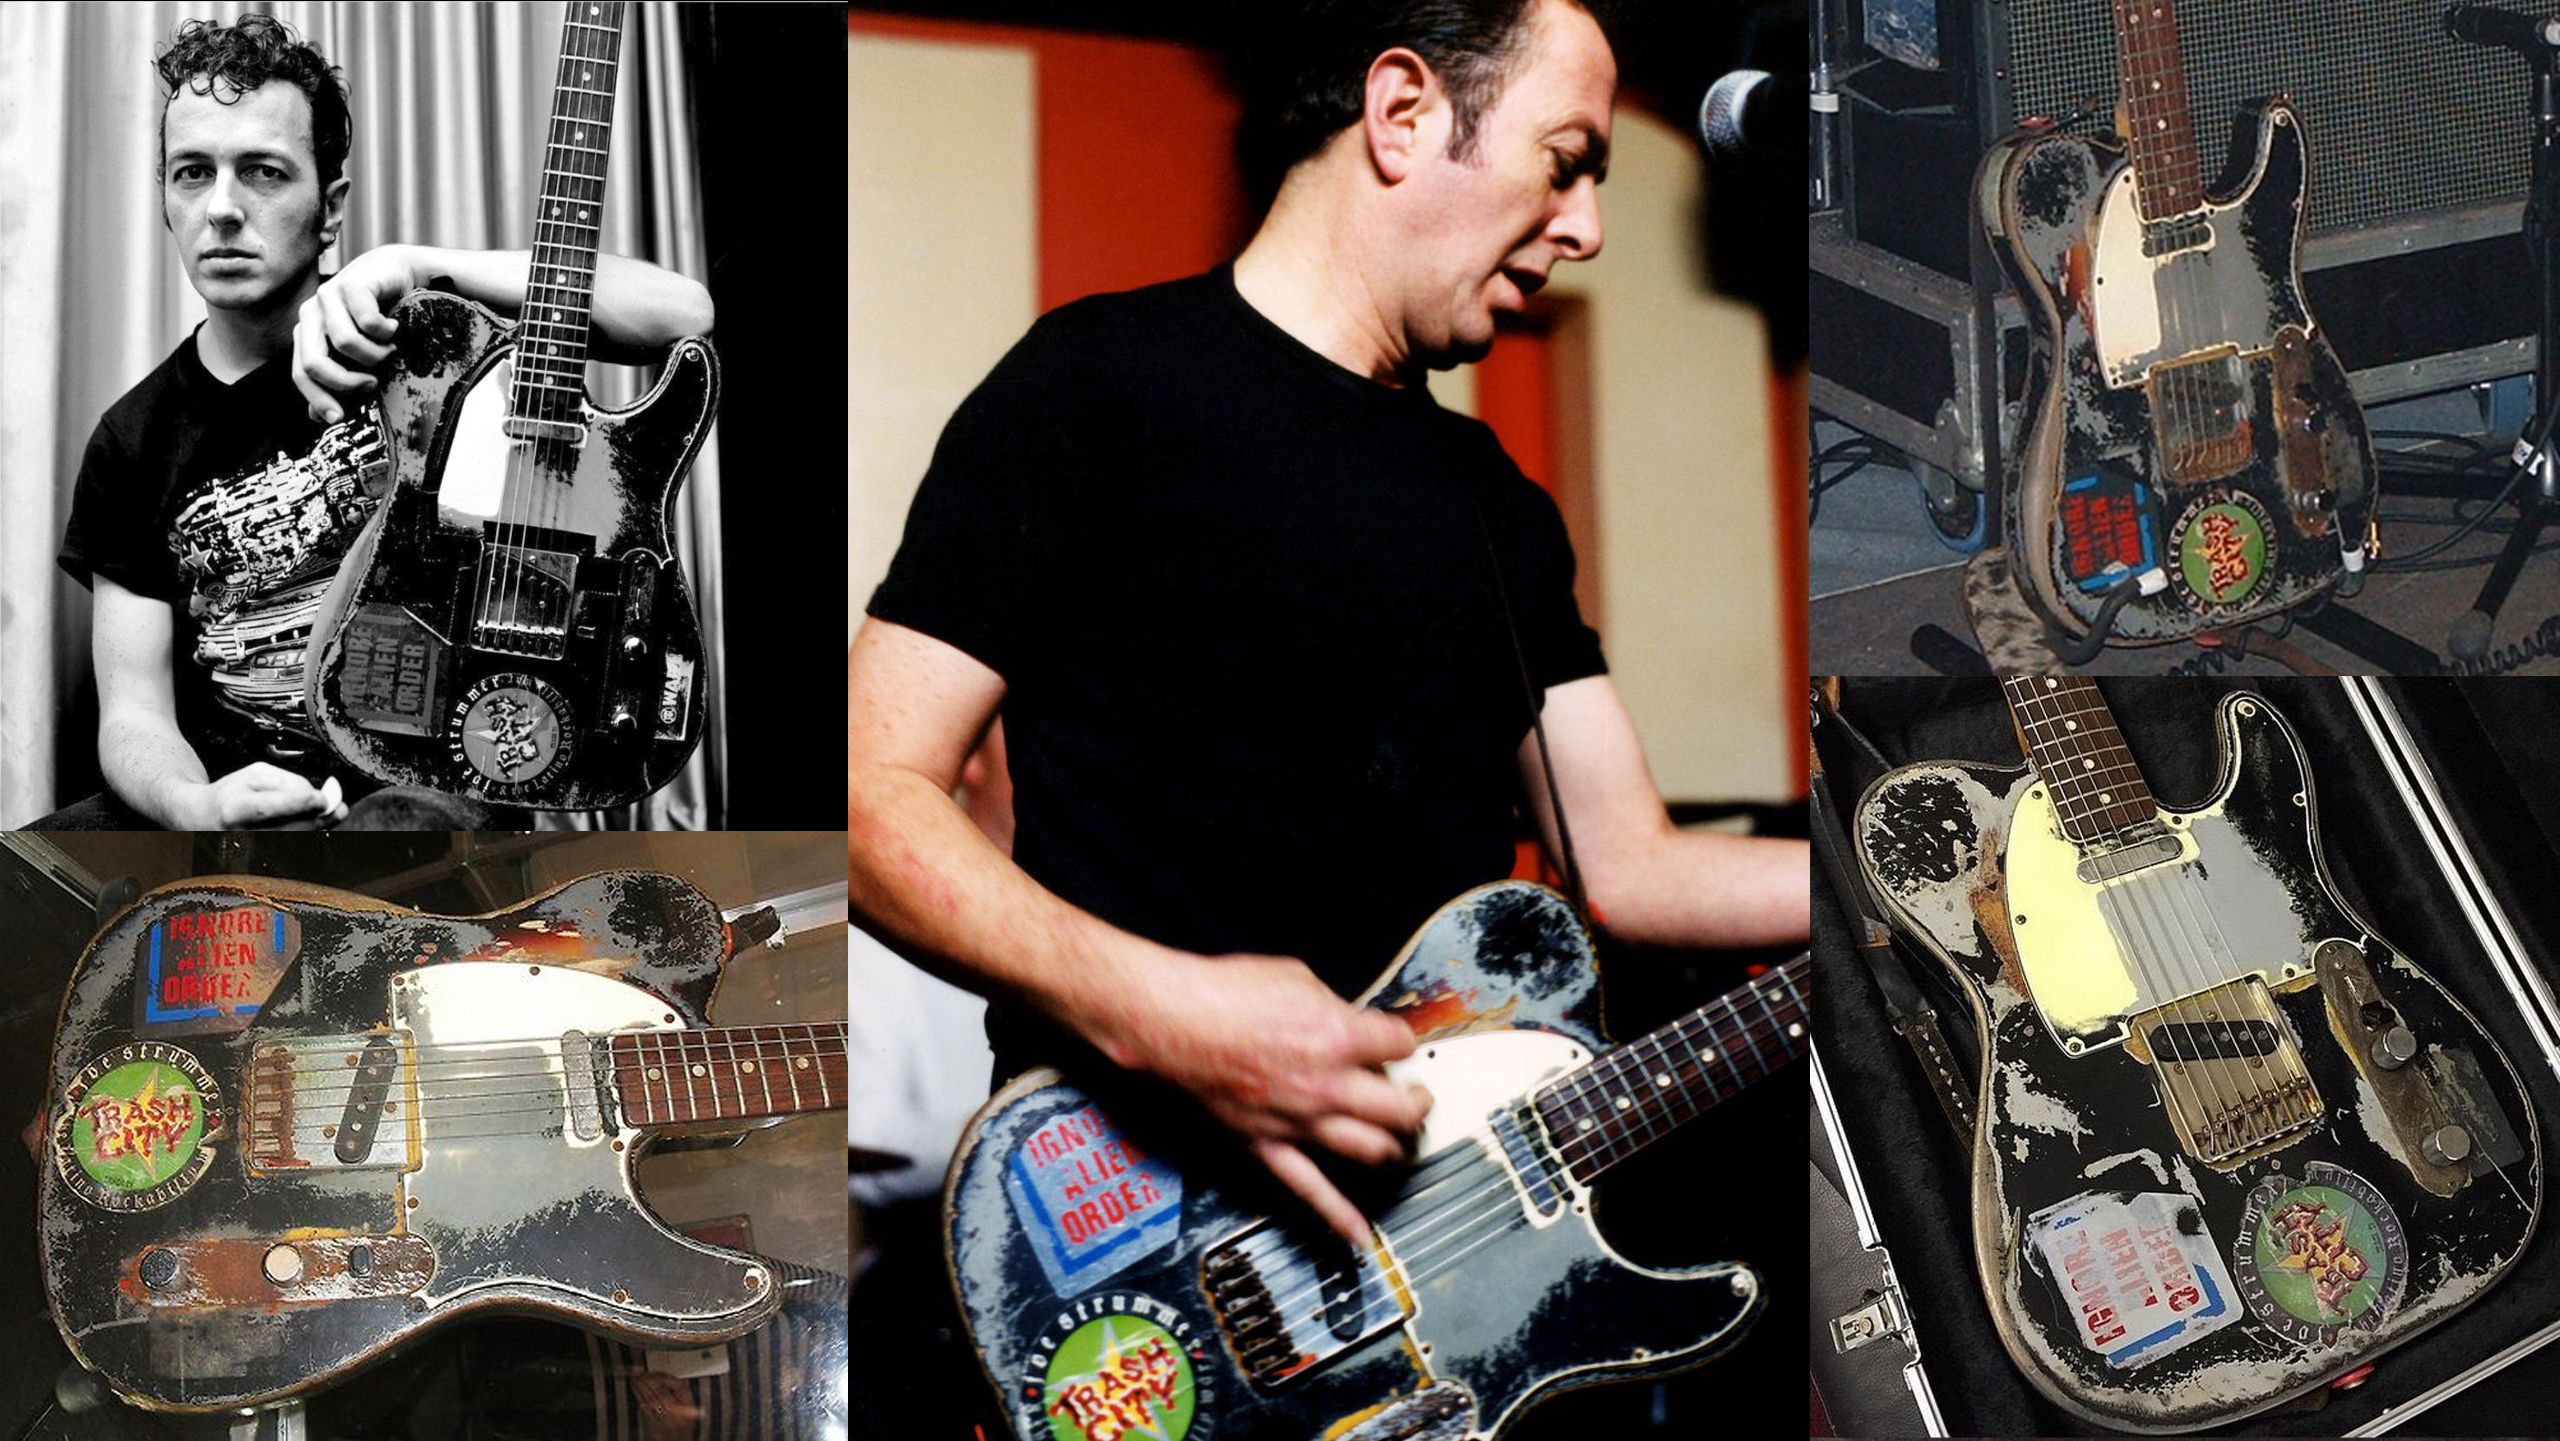
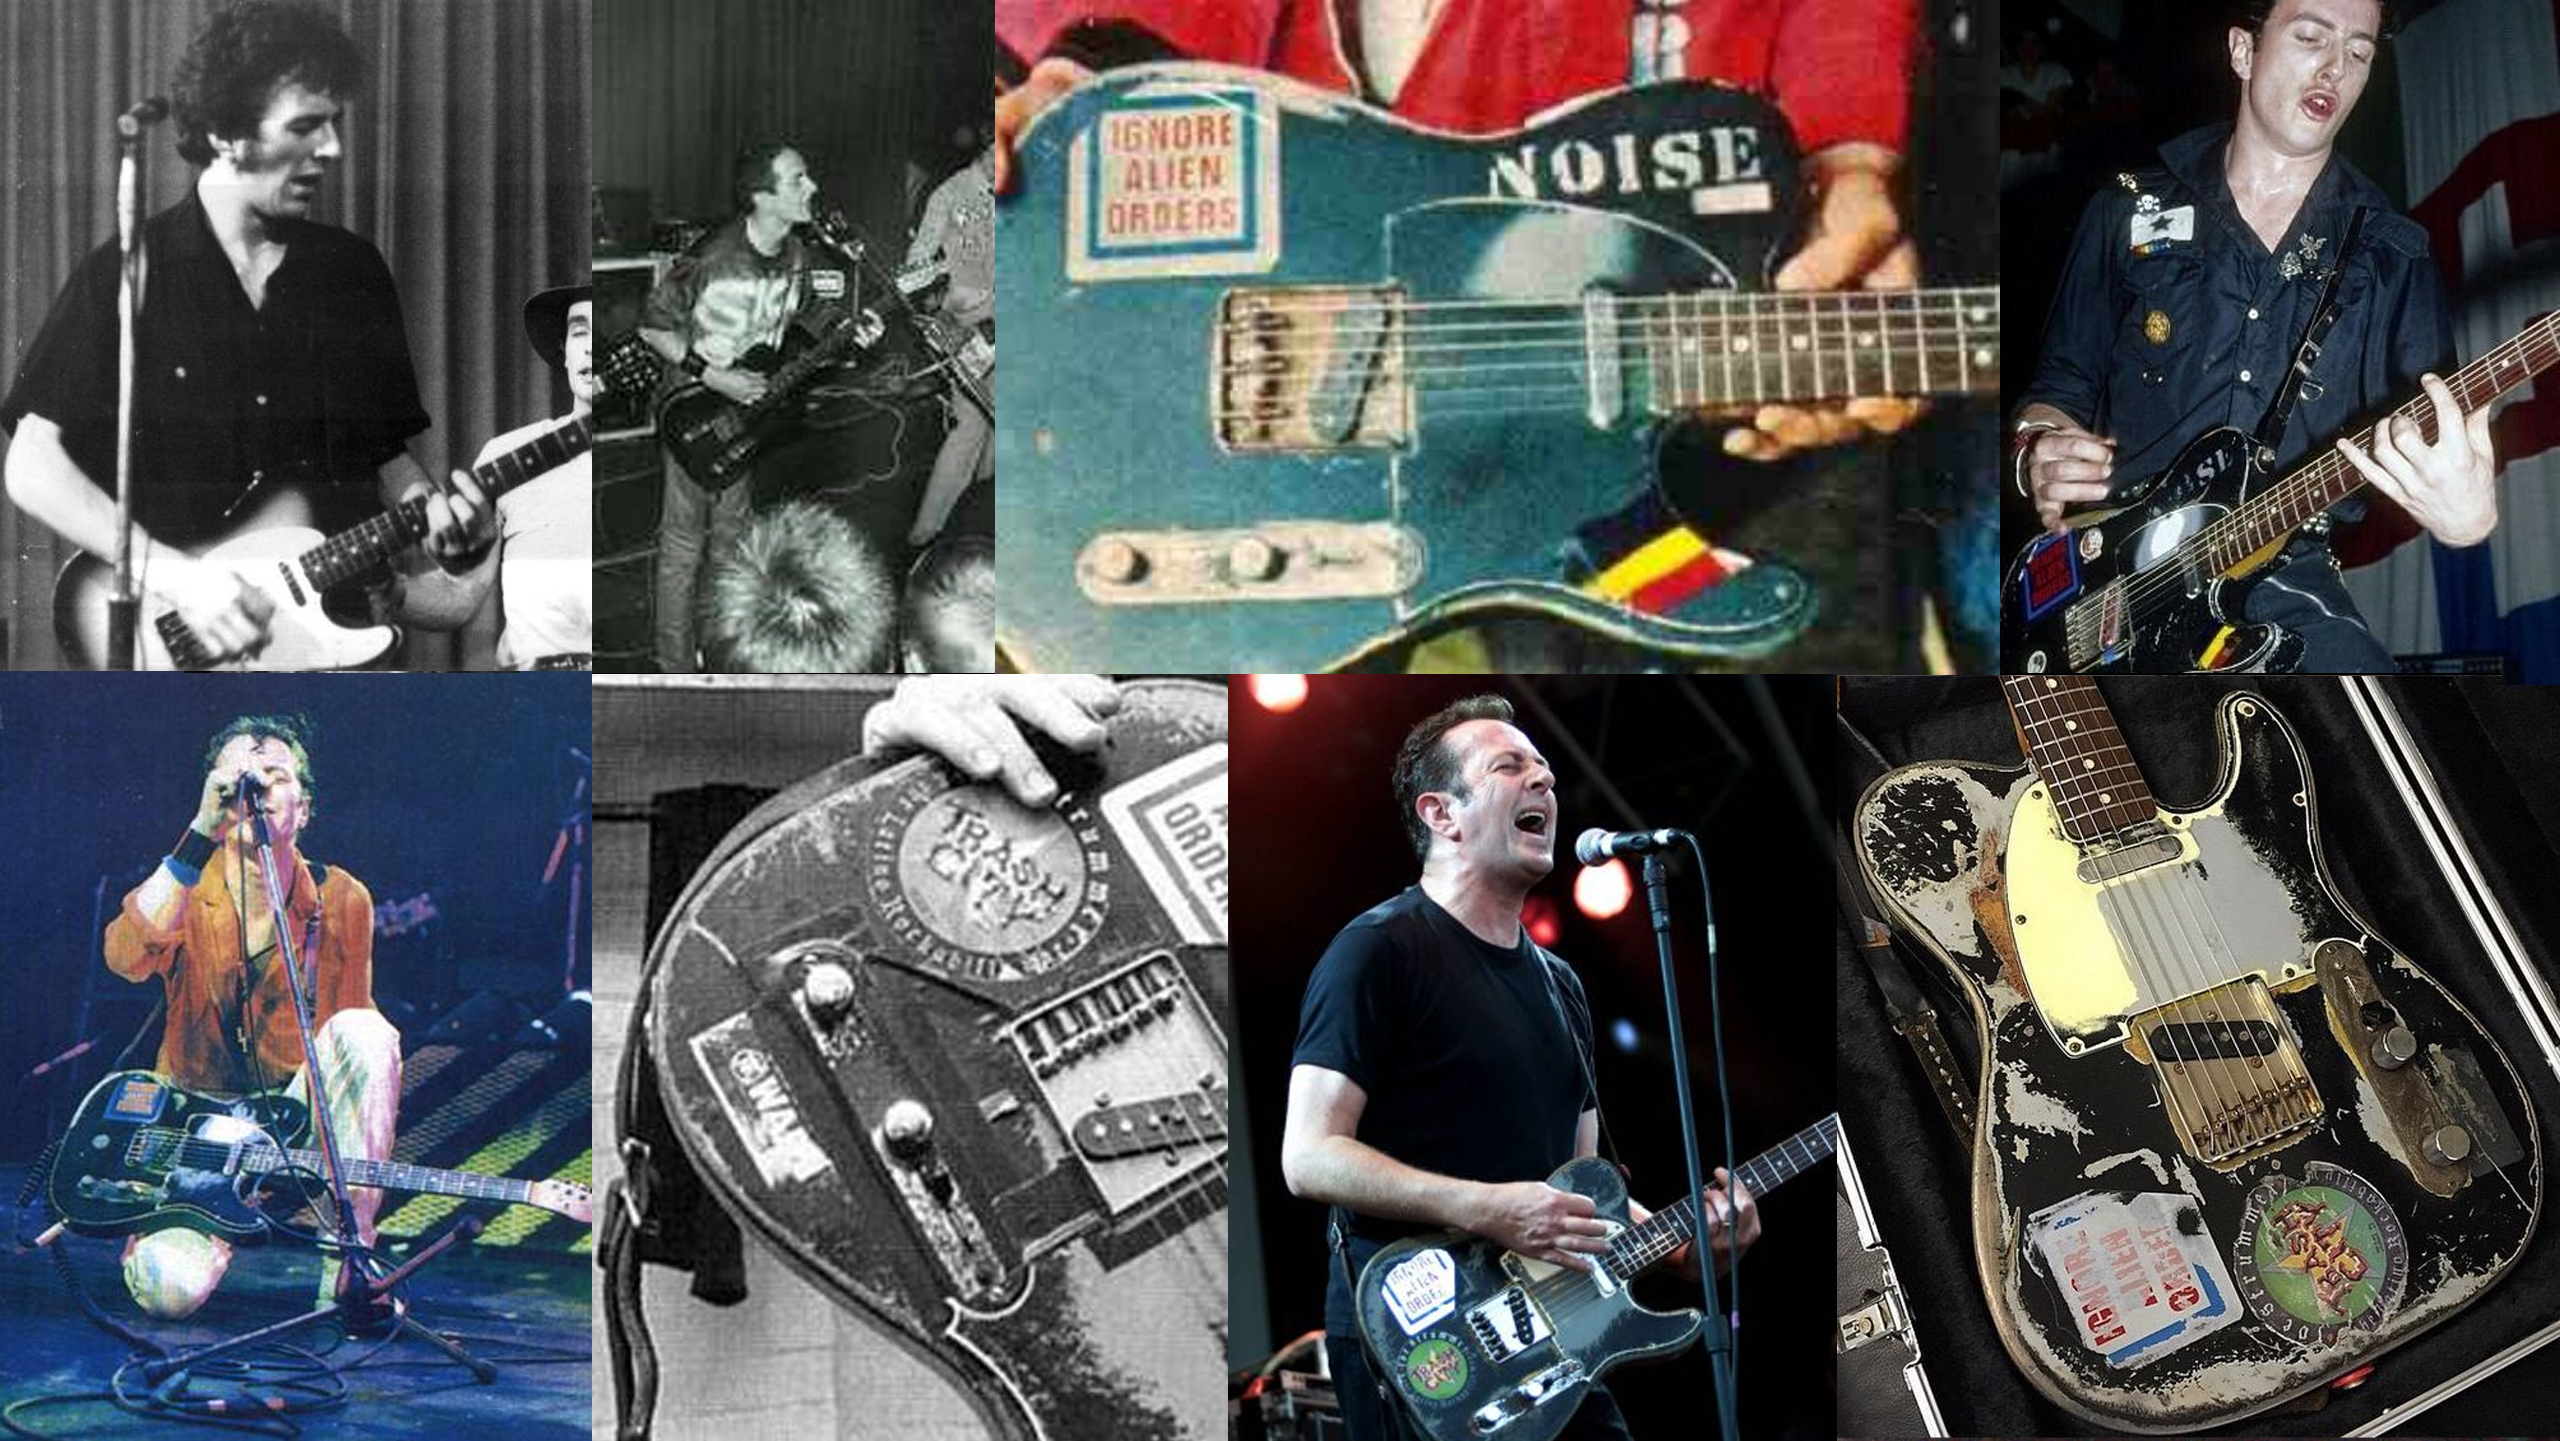
With most replica builds – the whole point is to try and produce a finished instrument which attempts to encapsulate some of the elements which, together, reproduce the unique patina, and authentic character of the original. To that end – Strummer’s old, battered and worn, ’66 Tele provides a considerable challenge. For any builder – it is an almost perfect inspiration – with many individual details and challenges to get stuck into. Get beyond the rights and wrongs, and contradictions, of actually trying to, in some way reproduce something – which, even now in the absence of it’s owner still seems to evoke a driving sense of DIY individuality, authenticity and complete rejection of corporate control… Get beyond trying to somehow copy the unique sum effects of a left-handed player, playing right handed, (and in such a vigorous manner that his famous “electric leg” action would eventually, and quite literally, erode the lacquer and paint from the form)… Get beyond trying to pretend to somehow be Joe Strummer… it’s just one of the coolest and most iconic guitars there is to study.
Like an old item of clothing – an instrument gradually takes on some of the character of it’s owner – and some venerable old guitars become literally battered – bearing tell-tale marks from every step of the way… every gig… every recording… After my previous, (first), Strummer build – I received a few comments and emails as feedback… some re-telling personal tales of seeing Joe’s original guitar… maybe holding it… maybe even playing it… even just being in the same room as it. Those interactions were memories as notable as meeting the man himself. The guitar was/is as individual as the man – and whilst the man is regrettably no longer with us – the guitar continues to somehow represent everything he was… everything he stood for…
I’ve long been fascinated by how the act of playing an instrument, can simultaneously create a, kind of, parallel… sculptural recording… A visual history of the sum efforts, movements and techniques involved – corresponding directly to the music it produces. A complex patina gradually created by physical interaction – and an overlay of, what we might call today… “meta” information. All of the tiny dints and scratches… the areas of rubbed-away finish… In this way – Strummer’s Telecaster is a literal, visual testament to his hard-working career with the 101ers, The Clash and Mescoleros. The guitar looks that way – because he played it that way… treated it that way… conceived it that way… made it that way. So when I look at building a relica, and study the visual aspects of what remains, as inspiration… I also have to consider the musical history it represents… the player… the career… and the musical history it created. A “tribute build“, for me is therefore an opportunity to revisit, and (re)immerse myself in the music of other times… other places…
So – in planning this “tribute build” – (let’s call it that, for now – since replica, as terminology, can be a difficult moving target, as I’ll soon come to) – a good deal of the initial planning decisions are simply about “getting the look right“. But those, perhaps more “cosmetic” decisions, also have to be balanced alongside “how the instrument actually sounds“, (another crucial layer of perceived “authenticity”). And – importantly, (and in this case especially) – since the instrument will be played in a live “Clash context” – (and not merely hung on a wall as decoration) – consideration needs to be taken for any individual preferences of the player, the instrument is built for. With my first attempt at a “Strummercaster” – I got so carried away with trying to get the look of the thing right – the distinctive marks of accumulated wear and tear – that I actually knocked a big chunk out of the body. (The white area on the back, which manages to replicate the look of a similar area on Joe’s original is, on my version – actually a big chunk of heavy-duty two-part wood filler). This time round – the end result has to have all of the playability, practicality, performance and resilience of a quality Fender guitar… whilst still looking, and sounding, “authentic” enough to “pass” for the original.
Finally – I’d also add another vital consideration, as having a workable budget – within which to try and achieve all of the above. In this game – you can have pretty much whatever you want – just so long as you have sufficient time and money to throw at it. Joe’s DIY ethos was strong… “Play what you got“, (and a lot of hard working musicians simply don’t happen to have the luxury of, even small, disposeable incomes…) – but you have to know what you’re doing, if you’re trying to be practical on a budget. Another way of looking at it – since authentic Fender is a big part of the story – (and Fender quality usually costs) – whatever I do here – I have to work within the usual expected “partscaster” budgets, and yet still find a way to “honestly” recreate something of the quality of the original.
However – before even a single component is sourced – first planning decisions mainly revolve around, “which version of Strummer’s guitar are we actually talking about?“…
Even the briefest study into the history of Joe’s guitar, reveals numerous possible windows onto individual events and processes, which would gradually shape it into the icon we see today. At certain points, key changes were made which – in combination with others, and under the effects of continual erosion – eventually became essential elements of the generally perceived “image” we hold. Since the guitar was in almost continual use – many of those additions would change regularly, (some even disappear entirely) – due to the combination of prolonged effects of wear and tear, and Joe’s notably vigorous and energetic playing action. And then to add to the mix… the fact that creative minds like Joe’s, can often be restless, and constantly changing…
The guitar, (originally a stock 1966 Fender Telecaster, with a sunburst finish), took a big step towards the way we see it now, when it was sprayed completely black at an automotive spray shop… Pickguard too… (“just spray it…” Manager Bernie Rhodes’s idea of “de-labelling” the band, and making every “component” of the band, of equal import). Early Clash gig-goers would have, over time, noted the appearance of a white “NOISE” stencil on the upper bout… an improvised red/yellow/green “Rastafari Flag” flash on the lower horn, and eventually – the signature “Ignore Alien Orders” sticker at the top of the lower bout. Other stickers came and went – becoming lesser, but nonetheless specific, footnotes in the evolving image… a small “Yin/Yang” roundel, and two less distinct, small (unidentified) stickers – one below the control plate, and another next to the “IAO” one. These would eventually disappear – leaving just tell-tale witness marks on the oversprayed, matt, acrylic finish.
Over the years – ever more of that same black car paint has randomly worn away, revealing – first – an underlying layer of grey primer… then, in places, patches of the original sunburst finish… even bare wood, underneath. The pickguard, meanwhile – serving almost like an archaeological “timeline” section cut – has graphically recorded the accumulated erosion of the finish, under countless playing actions. (“Strummer” interestingly, took his monicker from the, (somewhat dismissive), description of his repetitive hand action). All the time – Joe would evidently make periodic, functional “running repairs” with plain black “Gaffa” tape… (Traditionally – the musician’s “Swiss Army Knife” – a tool for all occasions. And with a black guitar – black Gaffa is, perhaps, the quickest and cheapest “touch-up” option available).
Eventually – (post Clash) – another characteristic sticker… the “Trash City” roundel… This addition specifically marked Joe’s continuing forward movement beyond his involvement with The Clash and, for many, it’s this later, Mescoleros era feature – in conjunction with the earlier, more weathered, Clash era relics – which, together, combine to form the most familiar and “iconic” image of Strummer’s guitar. Certainly – it’s this “late career” appearance, which was my main reference and inspiration, for this particular build.

Having settled on an idea of a “look” to work with – we can now get down to more technical details, and process issues. So… first considerations for the body…
It was primarily conceived to be a fully playable… professional instrument. (Not merely a stage “prop” or an ornament). It therefore had to have an authentic, solid, reliable construction as base. Alder ideally, (Fender’s standard tonewood) – with the right sort of shape and profile, so it looks, feels and plays right. (Compared with a Strat or a Jazzmaster, or even the shorter-scale Jaguar – the Tele always feels like a relatively compact, economical form. I often think of it almost like a Fender “Super Sport”. There’s no “belly cutaway”… no profile shaping over the lower bout… The stripped-back “no-frills” functionality of the “slab body” is part of the authentic “feel” of a Telecaster).
Practically speaking – one approach might be to take a genuine, contemporary, production Fender body – and then impose on it a, (somewhat lengthy and involved), relicing schedule… replicating a similar, (but obviously truncated), dash through some of the key processes we know Strummer’s own guitar would have been shaped by. However – this would take a long time. It would also, likely, prove hideously expensive – and much effort would eventually be wasted, going round and round in (non-productive) circles. Also – at the more affordable end of the Fender line – new, contemporary bodies are generally finished with thick coats of Polyurethane. Although it’s durable – as a material – urethane does not usually “relic” well. Instead – it’s usually preferable to work with a more vintage-authentic, nitro finish… Much thinner – easier to rub through – and also easier to repair, rebuild and polish as required. It’s also compatible with many solvent-based car paints – so the whole piece can be built-up, and then artificially aged, using the usual nitro “relicing” techniques.

In searching for the ideal starting point, therefore – we looked for a balance between availability, affordability, adaptability and authenticity… “but it had to be finished in nitro“. Because of the different, layered finshes required – the nitro spraying was probably going to have to be done by someone with a pro setup. There are a few “Joe Strummer” custom spray shop replicas out there, on the market – but this one by “oldskoolrelics custom shop” seemed to be the best for our purposes. From what I could see – it looked like a decent Hosco, or even Guitarbuild replica body construction – with a decent-looking nitro paint job, which seemed to cover most of the stylistic bases. A matching pickguard was thrown in with the deal – as well as some replica stickers, and even a representative and reasonably “Strummer-correct” patch of distressed Gaffa, down by the control rout. This would certainly make a good starting point for “the look” we were after… supplied finished, at a total cost approaching somewhere close to the cost of a brand new, (but un-reliced), Fender urethane finished body.
In planning to subsequently fit-out the body – and addressing the actual “functionality” of the instrument – I was otherwise determined, (as much as possible), to stick with stock Fender components throughout. Initially – I had thought to relic a generic “vintage style” neck to match with the body – but Sam (the eventual owner of the guitar), was much more familiar with a modern Fender, flatter radius board – with beefier frets. If you’re used to playing a particular flavour of Fender – there’s not much sense fighting practicality. So although the guitar initially came together with a spare reliced Tele neck I’d been prepping for another build – it was, eventually, to develop as a heavily reliced replica body – paired with a new, modern Fender neck. (The generic neck acted as a useful “placeholder” – until we could find something suitable, at the right price, and since it was dimensionally accurate, and notionally reliced – we could leave the actual, final choice of neck until quite close to the end of the build process). With an otherwise quality body, and with other genuine Fender components used throughout – a Fender neck would, theoretically, bolt straight on – and we’d then be just a setup away, from a fully-functional instrument.
The body, from oldskoolrelics, was a custom order – so although plans began in, probably, August of last year – I didn’t get to see the finished body, “in the flesh” – until November/December. With a turnaround target for “February-ish” – I still had plenty of time to source and prep the hardware – with the holiday period, at the end of the year, to carry out any additional detail work required on the body. When the body eventually arrived – the finish was already quite a way along the lines I’d envisaged… But there were a few details I thought needed a little more attention…
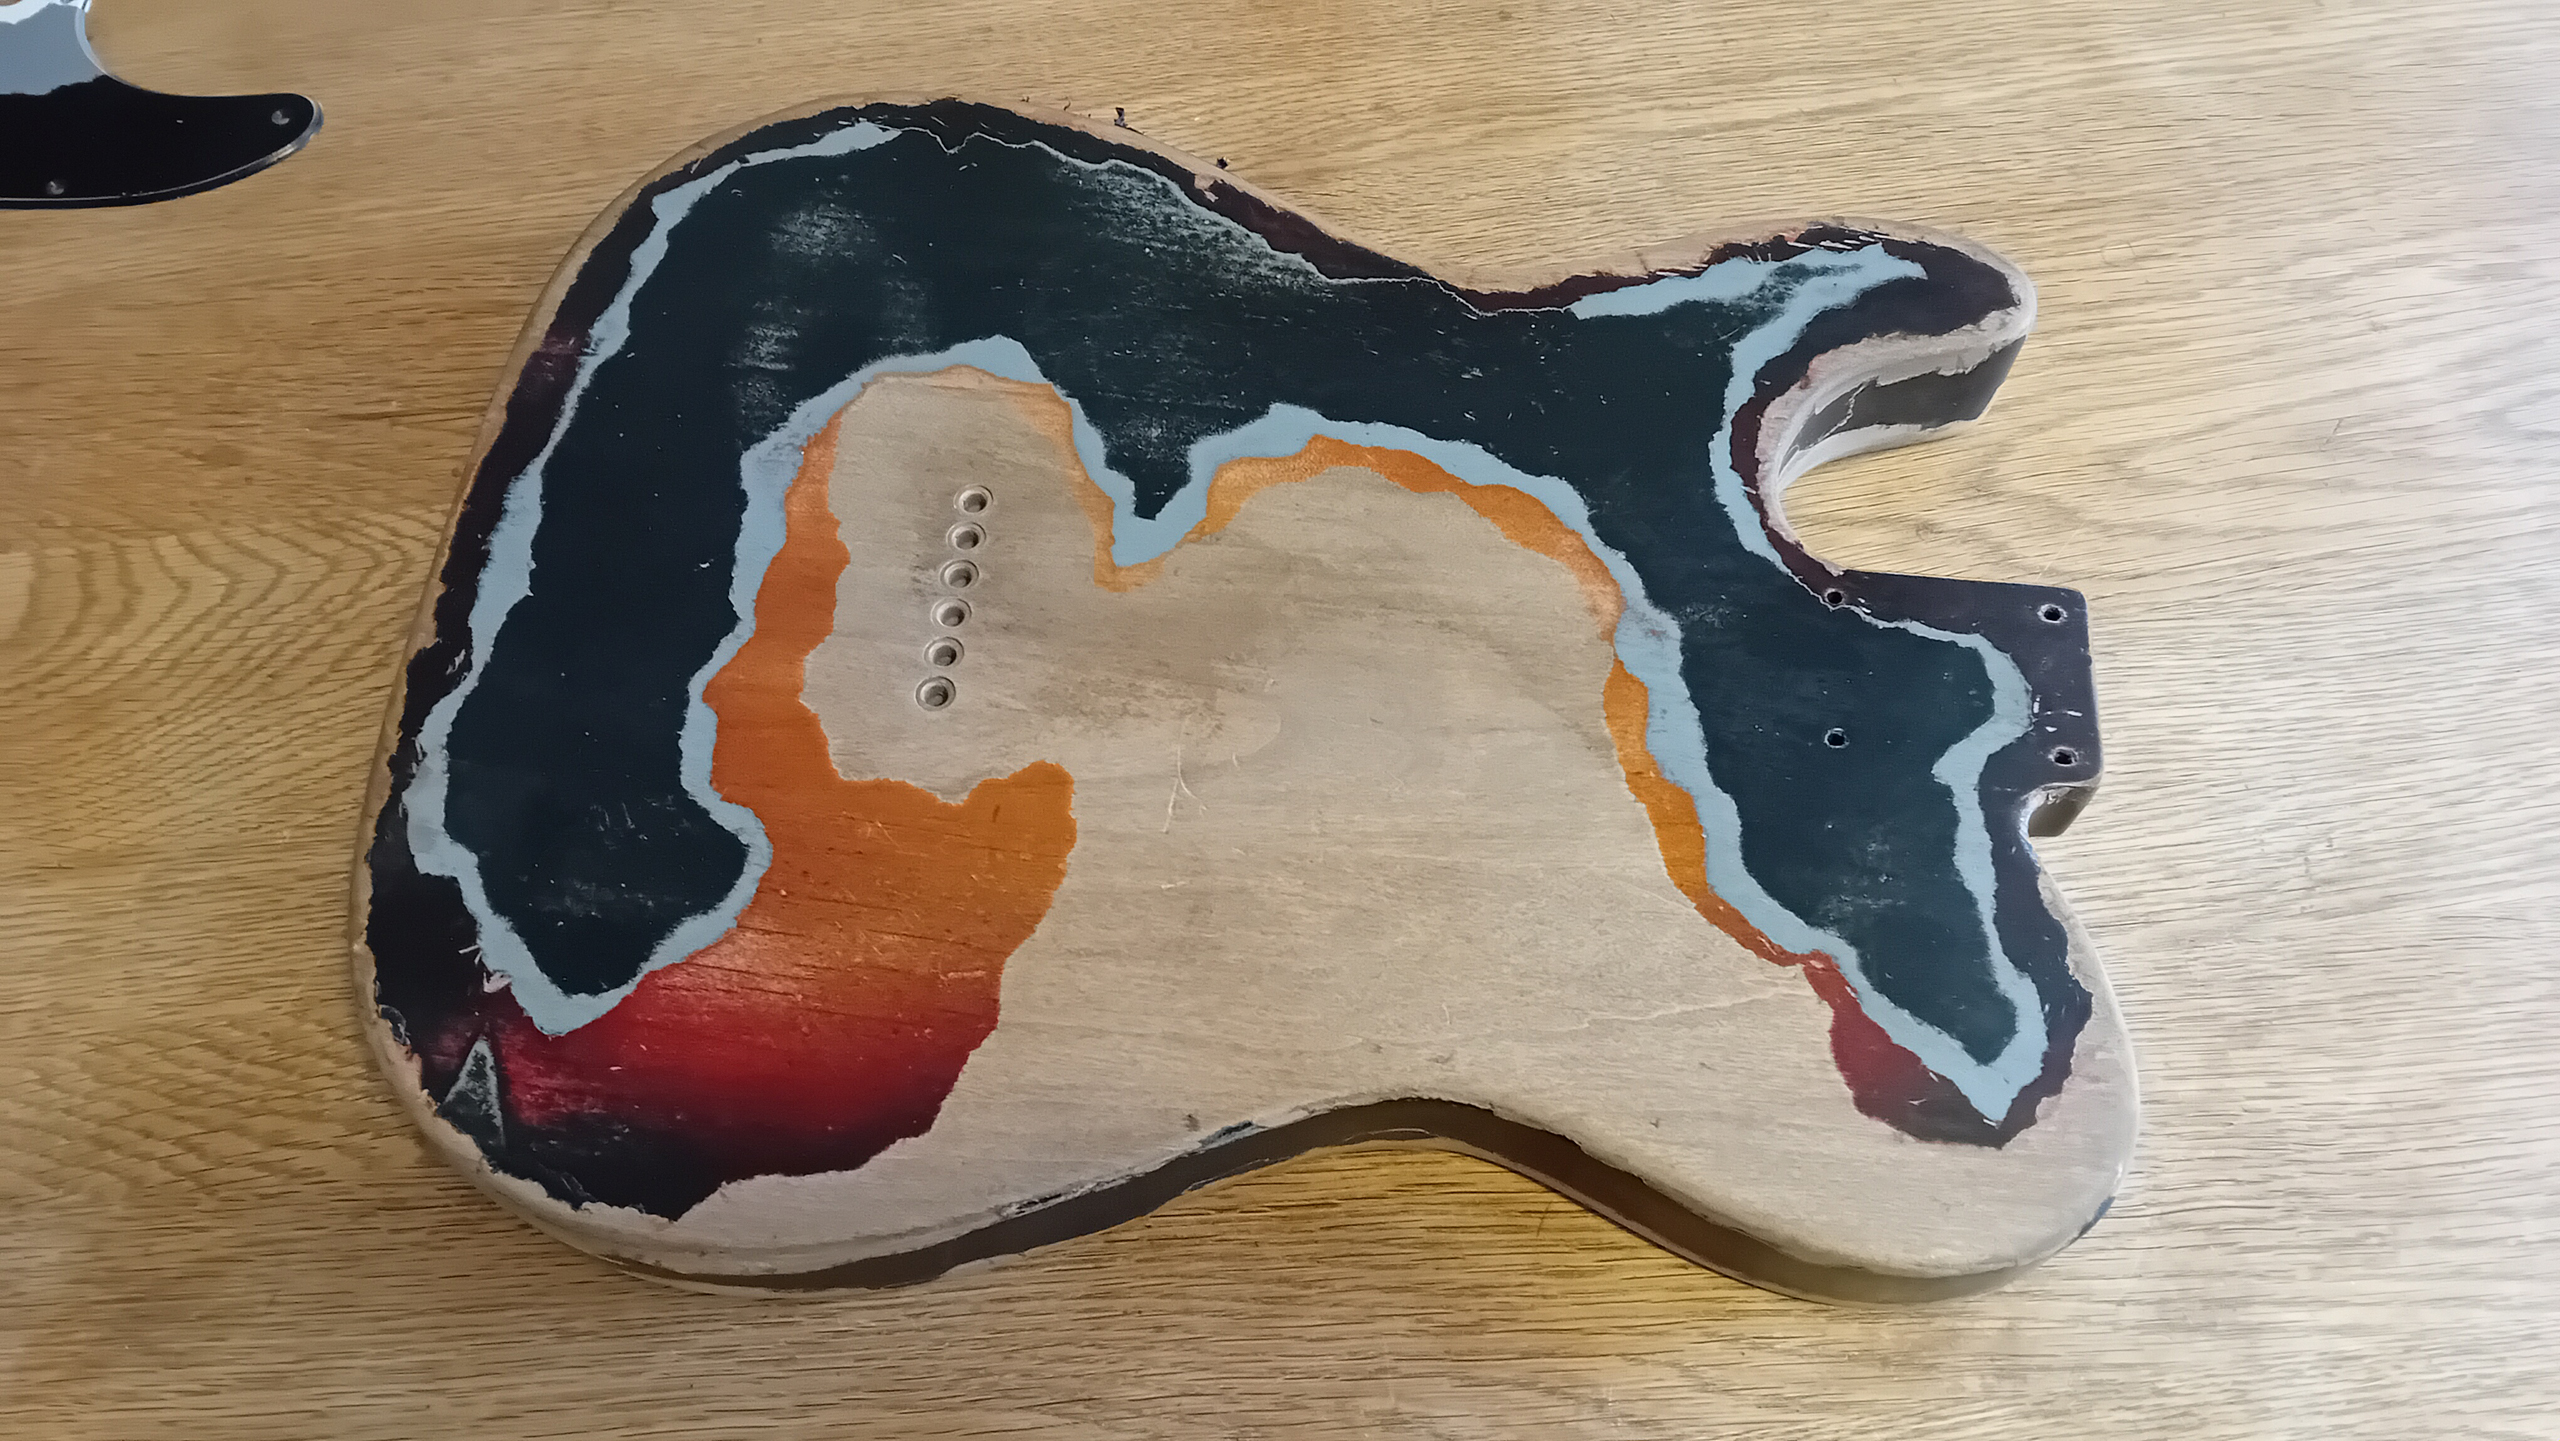
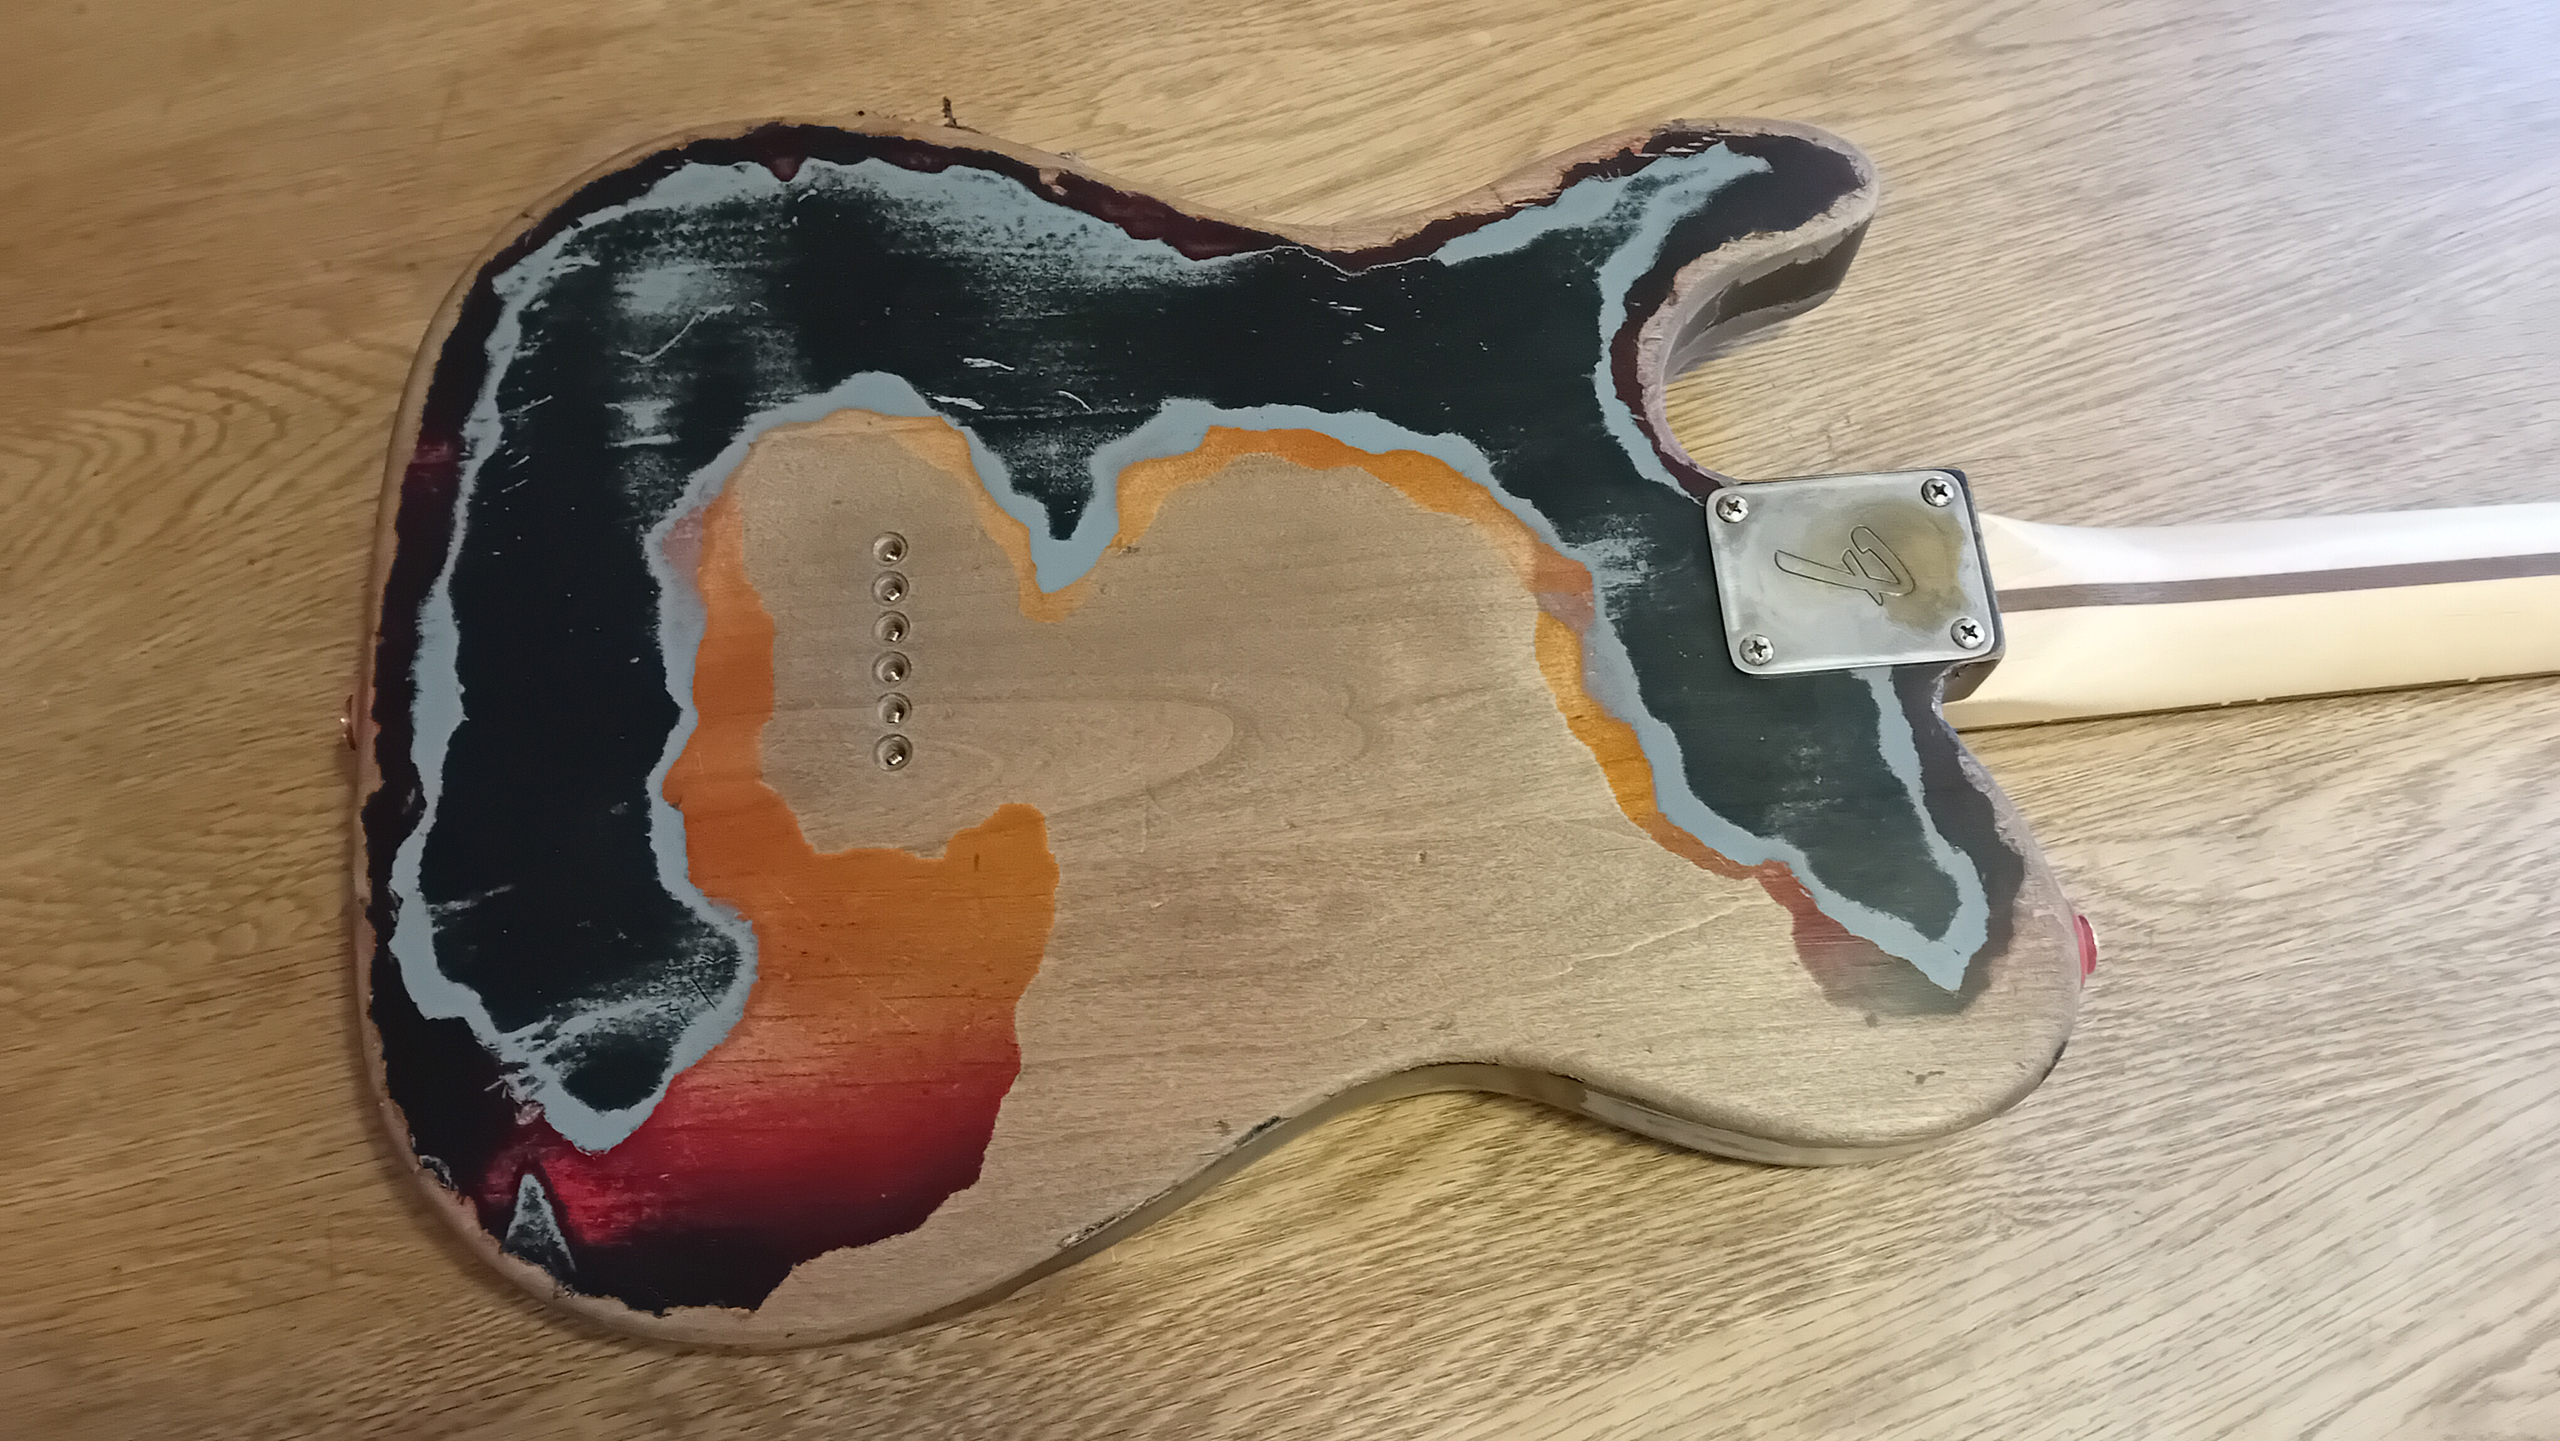
Obviously – when painting the body – the most economic approach, in terms of time and money – means that you don’t paint certain areas. Especially if they’re eventually going to be rubbed-back to bare wood again. For a “complicated design” like Strummer’s Tele – that inevitably means a certain amount of careful layering, masking and stencilling. Fender’s own “Artist” series of the same instrument clearly shows a similar approach – but in my opinion – the hard edges created by “economical” masking, simply don’t have the subtle patina and look of authenticity. The earlier Fender “Signature” guitars look like screen-printed designs on brand-new bodies. All this is less important, obviously, on the back of the guitar – (and I don’t think anyone really has an idea of what the back of Strummer’s Tele currently looks like anyway. I doubt few even consider it). In this case – experimenting with the back of teh guitar, gave me an opportunity to test the thickness of the paint coats, and to plan an approach which might carefully soften some of the hard lines and transitions – without taking too much of the original paint job off.
I also had to consider that – even this current finish will, itself, in time, be subject to the usual wear and tear associated with regular play. As such – the original finished body, as supplied, will undoubtedly “weather naturally” with continued play. I therefore decided not to get too involved with the back – beyond using it as something of a test case. Having only slightly softened the original stencil lines with the usual abrasives, (lubricated and “wet-sanded” with naphtha) – a general application of relic wax, applied with fine 0000 grade wire wool, darkened the bare wood slightly, and created a polished-but-dull, smooth and “warm” tactile feel to the finish. Repeated use erodes paint – but it also polishes it.

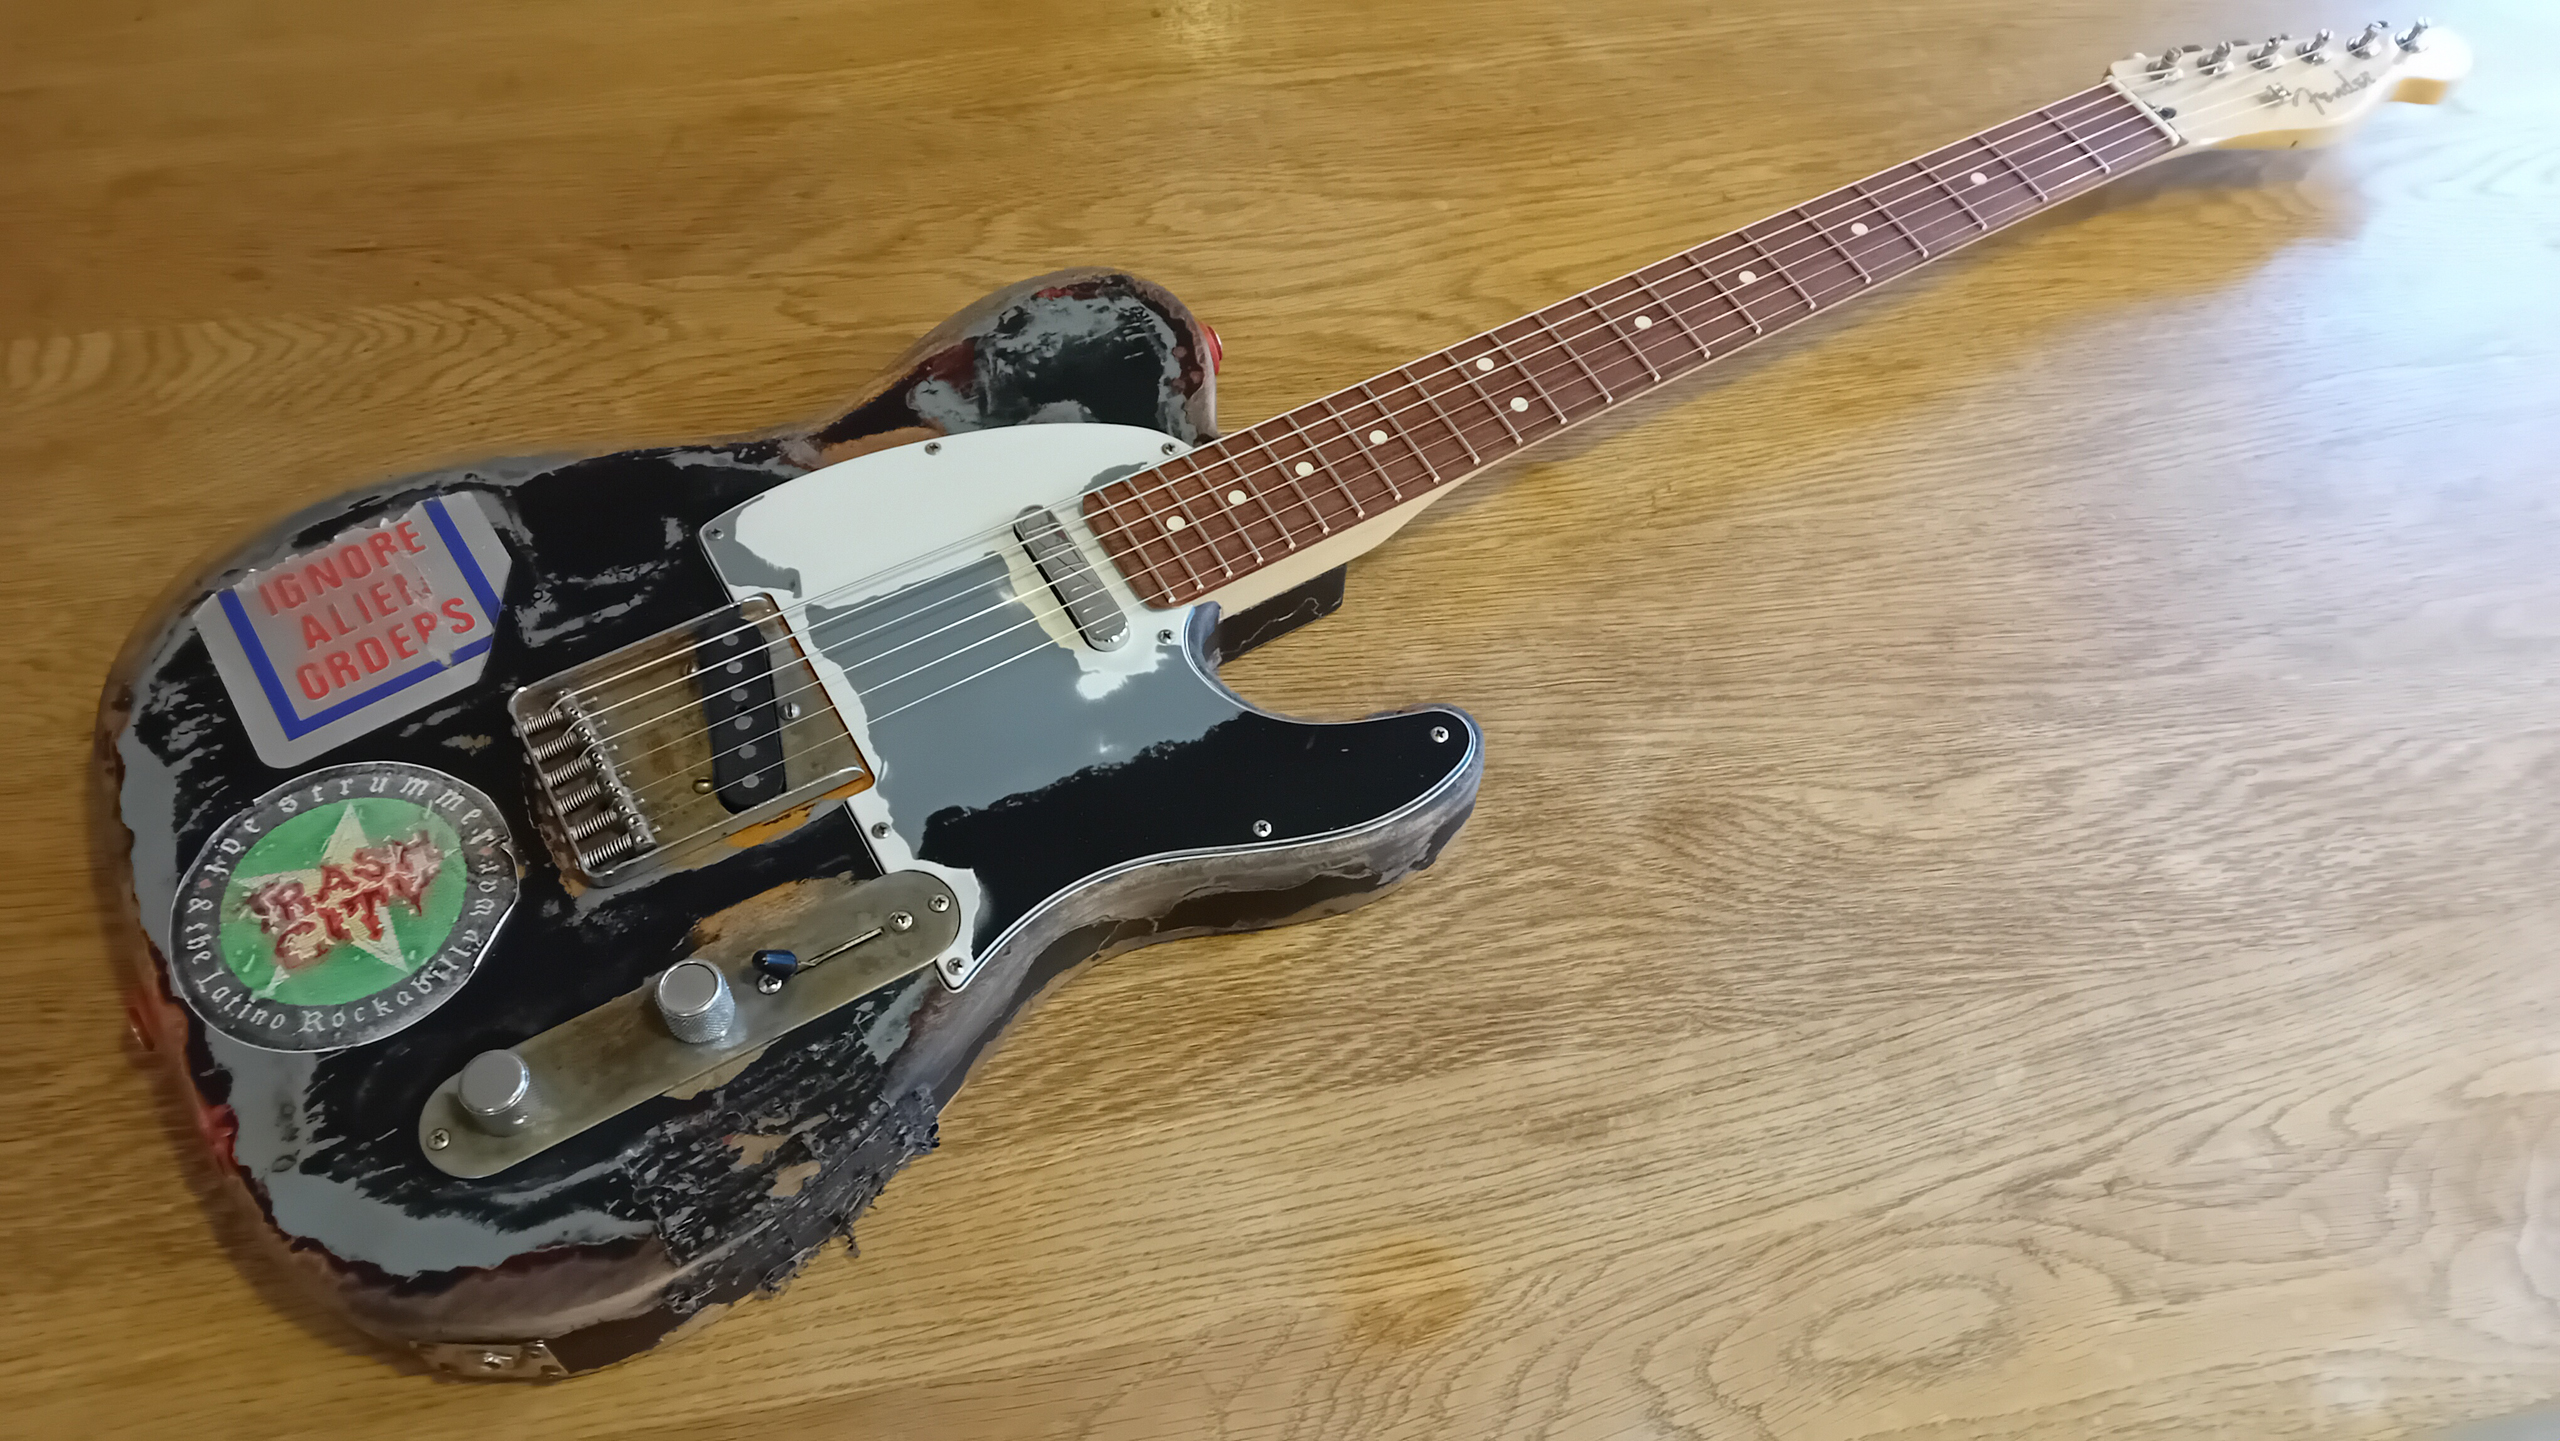
What I learned on the back of the body, was then carried over onto the sides and face. On first examination, and comparing the design against my “reference” – I found there was a lot more bare wood and exposed sunburst finish, than I might have originally expected. The body certainly looked like “a Joe Strummer Tele“, but not quite close enough to “Joe Strummer’s actual Tele“… Reference photo’s of Joe’s original – on-stage, (or from the rare occasions it’s been on display) – give an overall impression as being much more consistently black/grey – with only very small areas eroded through to sunburst, and bare wood below. The replica pickguard had obviously been stencilled in a similar way to the body, and the transition lines were hard, and lacking detail… The applied “Alien Orders” sticker – it turns out – wasn’t mirrored and metallic, as it should be. Additionally – some of the accumulated metal hardware which was to be fitted – (like the second-hand Fender six-saddle bridge) – was still shiny and new. My job, in curating and fitting out this instrument, was now to carefully shade some of the paintwork… relic the hardware… to soften the edges and assemble everything to get the right, consistent, look and feel…
I call this next bit, “detailing“…
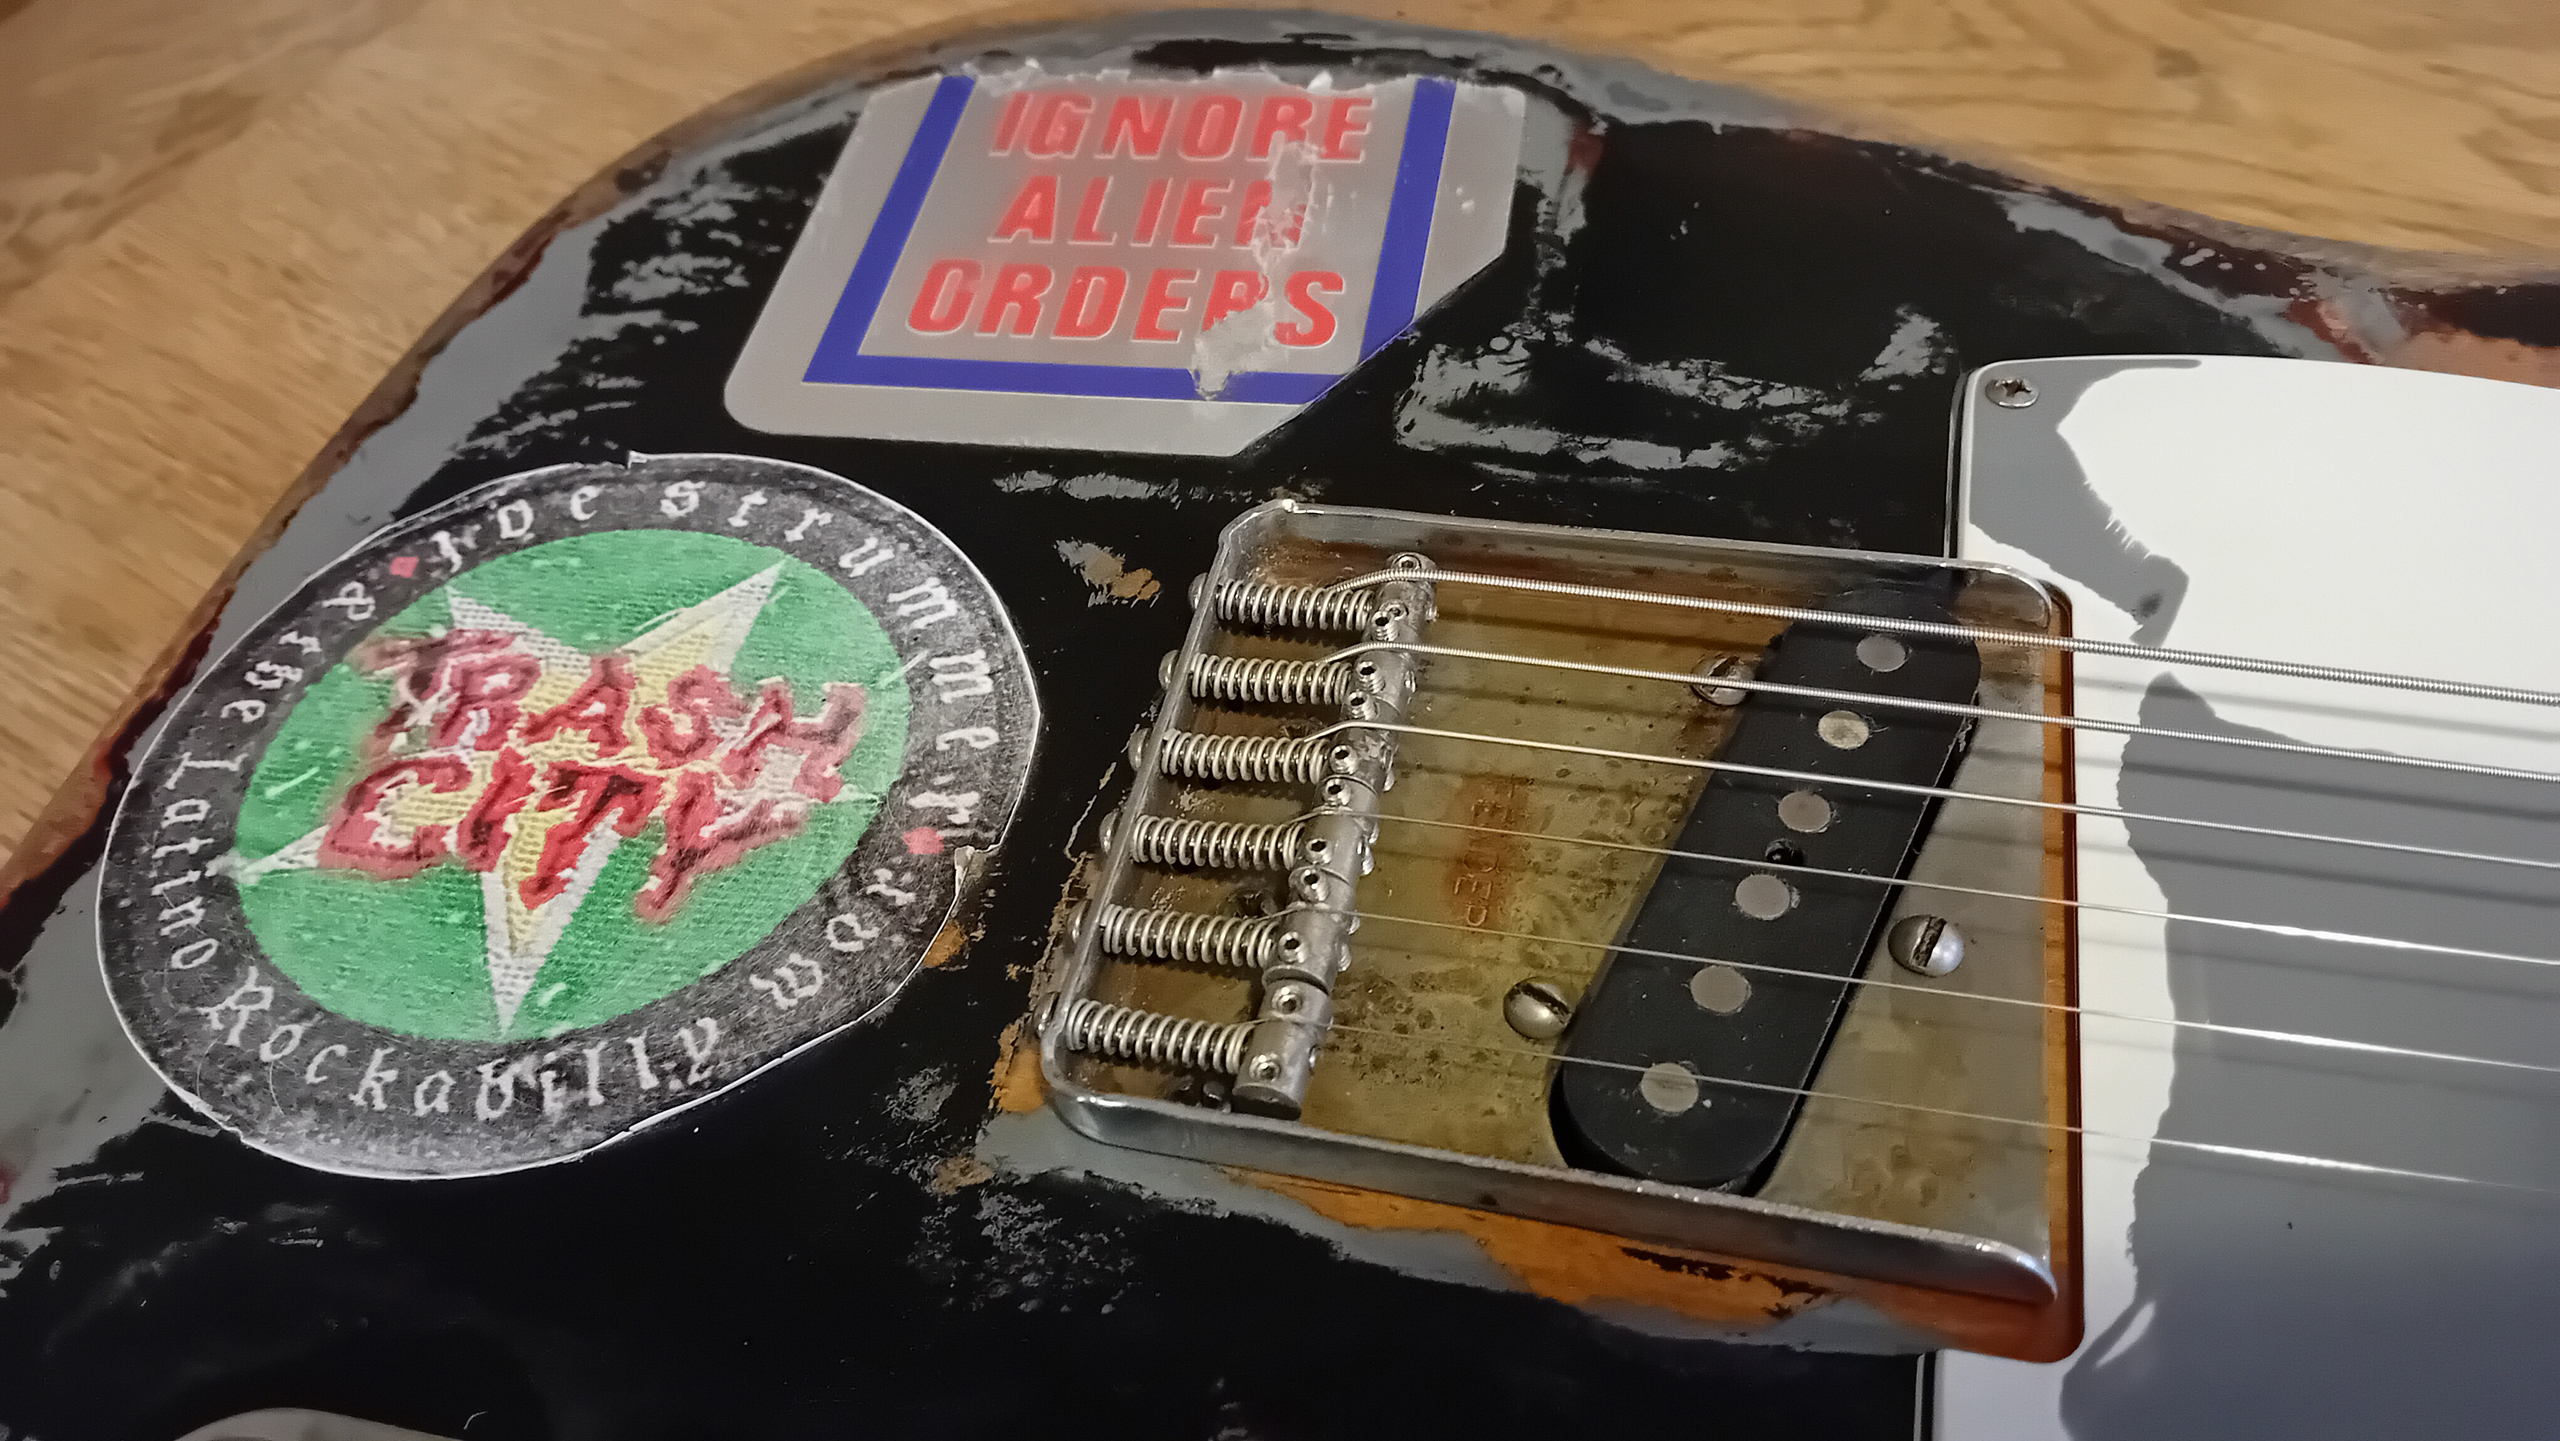
The “IAO” sticker supplied was stripped, (and kept as souvenir on the workshop wall). A new metallic one put on order from Axetreme Custom Shop, in the US. (The only place I can source reasonable replicas). After a test-fit with the stand-in neck, (which allowed me to double-check that all of the hardware was correctly installed in-line) – the body “design” was modified using a Badger airbrush, some black nitro lacquer, grey auto primer, some rattle-can matt black car paint and assorted abrasives. (It’s important to keep the surfaces clean, and receptive to paint at this stage – so no waxes or polish. All “wet-sanding” was done with naphtha as a lubricant). Around the bridge area, at the lower control plate, and at the “top” of the body – where too much bare wood was exposed – it was necessary to build up an entirely new layer of solid black paint over new primer. Generally – I just wanted to provide a little more black over grey – with some softer, blended transitions in places, and the exposed grey areas looking less dominant… but more detailed.
At this working stage, I was closely referring to particular details in a couple of close-up photos of Joe’s original guitar I’d managed to source. However – a lot of what you can actually do, is limited by how the existing paint already lies. With this sort of work, I always have to try and work within the limitations of what’s there, and try to make subtle changes which help evoke the character of the original, despite some obvious differences in detail remaining.
Practically – this involves a bit of creative masking – gradually re-evolving the paintwork beyond it’s initial, logical, base/primer/topcoat sequence. You might, for instance, end up with places where isolated islands of primer ended up on top of black nitro, with matt black on top of that… You might rub through black and grey… only to uncover another layer of original black – and then build-up again from there. For a while – the whole finish is essentially “in flux” – but you can always choose to “stick” at any time… Protect some areas from future abrasion with tactically-placed barrier coats of clear gloss nitro – as other areas are allowed to develop at their own pace… New colour topcoat straddles both previously primed, and unprimed areas alike – creating subtle textural differences due to differing adhesion qualities and substrate porosity… Matt black butts-up against gloss black… Hard transitions between black topcoat and grey primer are scratched away to provide the finer visual detail desired…
The danger is… It can potentially run away from you, and end up as an uncohesive mess…
However – if you keep tabs on things, and don’t let the work get on top – you can progress towards a desired intent, and still remain open to the possibility of, at least some, serendipity in what emerges. After all – real “accidental” marks evolve through accident – not design. It’s important not to try and make things look too contrived. You have to, kind of, guide the paint job back towards the way you want it, and basically just learn when to leave things the way they are, or the way they have become… Eventually – it all gets polished down with more fine grit papers anyway… More naphtha… and yet more 0000 wire wool. (Get the replacement stickers stuck down before you get wax anywhere near the bodywork). A final “regularising” rub-over with wire wool and wax… The final finish now has the same tactile warmth as the back, and much more additional detail. A proper patina…
At the sides of the body – a little Black Bison and relic wax, helped to visually soften the, sometimes, sharp and jagged transition from paint to bare wood – with a little extra grey detail revealed, here and there, through abrasion. (The characteristic grey rectangle – left behind where Joe used to tape his set running orders was reproduced by scraping away the black topcoat with a flat blade). Additional special attention was given to the area around the lower cutaway “horn” – where the contrast between the dark painted, bevelled edge of the scratchplate, and stripped, bare wood – looked incorrect, and didn’t visually telegraph the body outline enough. Instead – the bevelled edge of the 3-ply plastic was scraped clean, with the background wood darkened to produce a more authentic look.
The face of the scratchplate itself, was worked-up separately – without having to add any more paint at all. Instead – aside from cleaning-up the edge – the transitions were generally softened using fine polishing grit papers and naphtha. Detailing was added by scraping with a fine blade – especially at the black / grey transition – to imitate the effect of countless plectrum scratches. (All detail ultimately has to be “believeable“. Each effect should imply a plausible physical cause. The brain is capable of unconciously picking up on so much fine contextual detail, that we can sometimes, almost without thinking, easily spot “fake”). The final “design” was then given a light coat of clear lacquer, to help “hold” it in that state for a while, and to add a light level of resistance to the action of future play. Like the rest of the body – the finish will continue to gradually weather, naturally. But there’s nothing wrong with a light rub-back to take off any gloss, and a little relic wax to add some extra “dirt”…
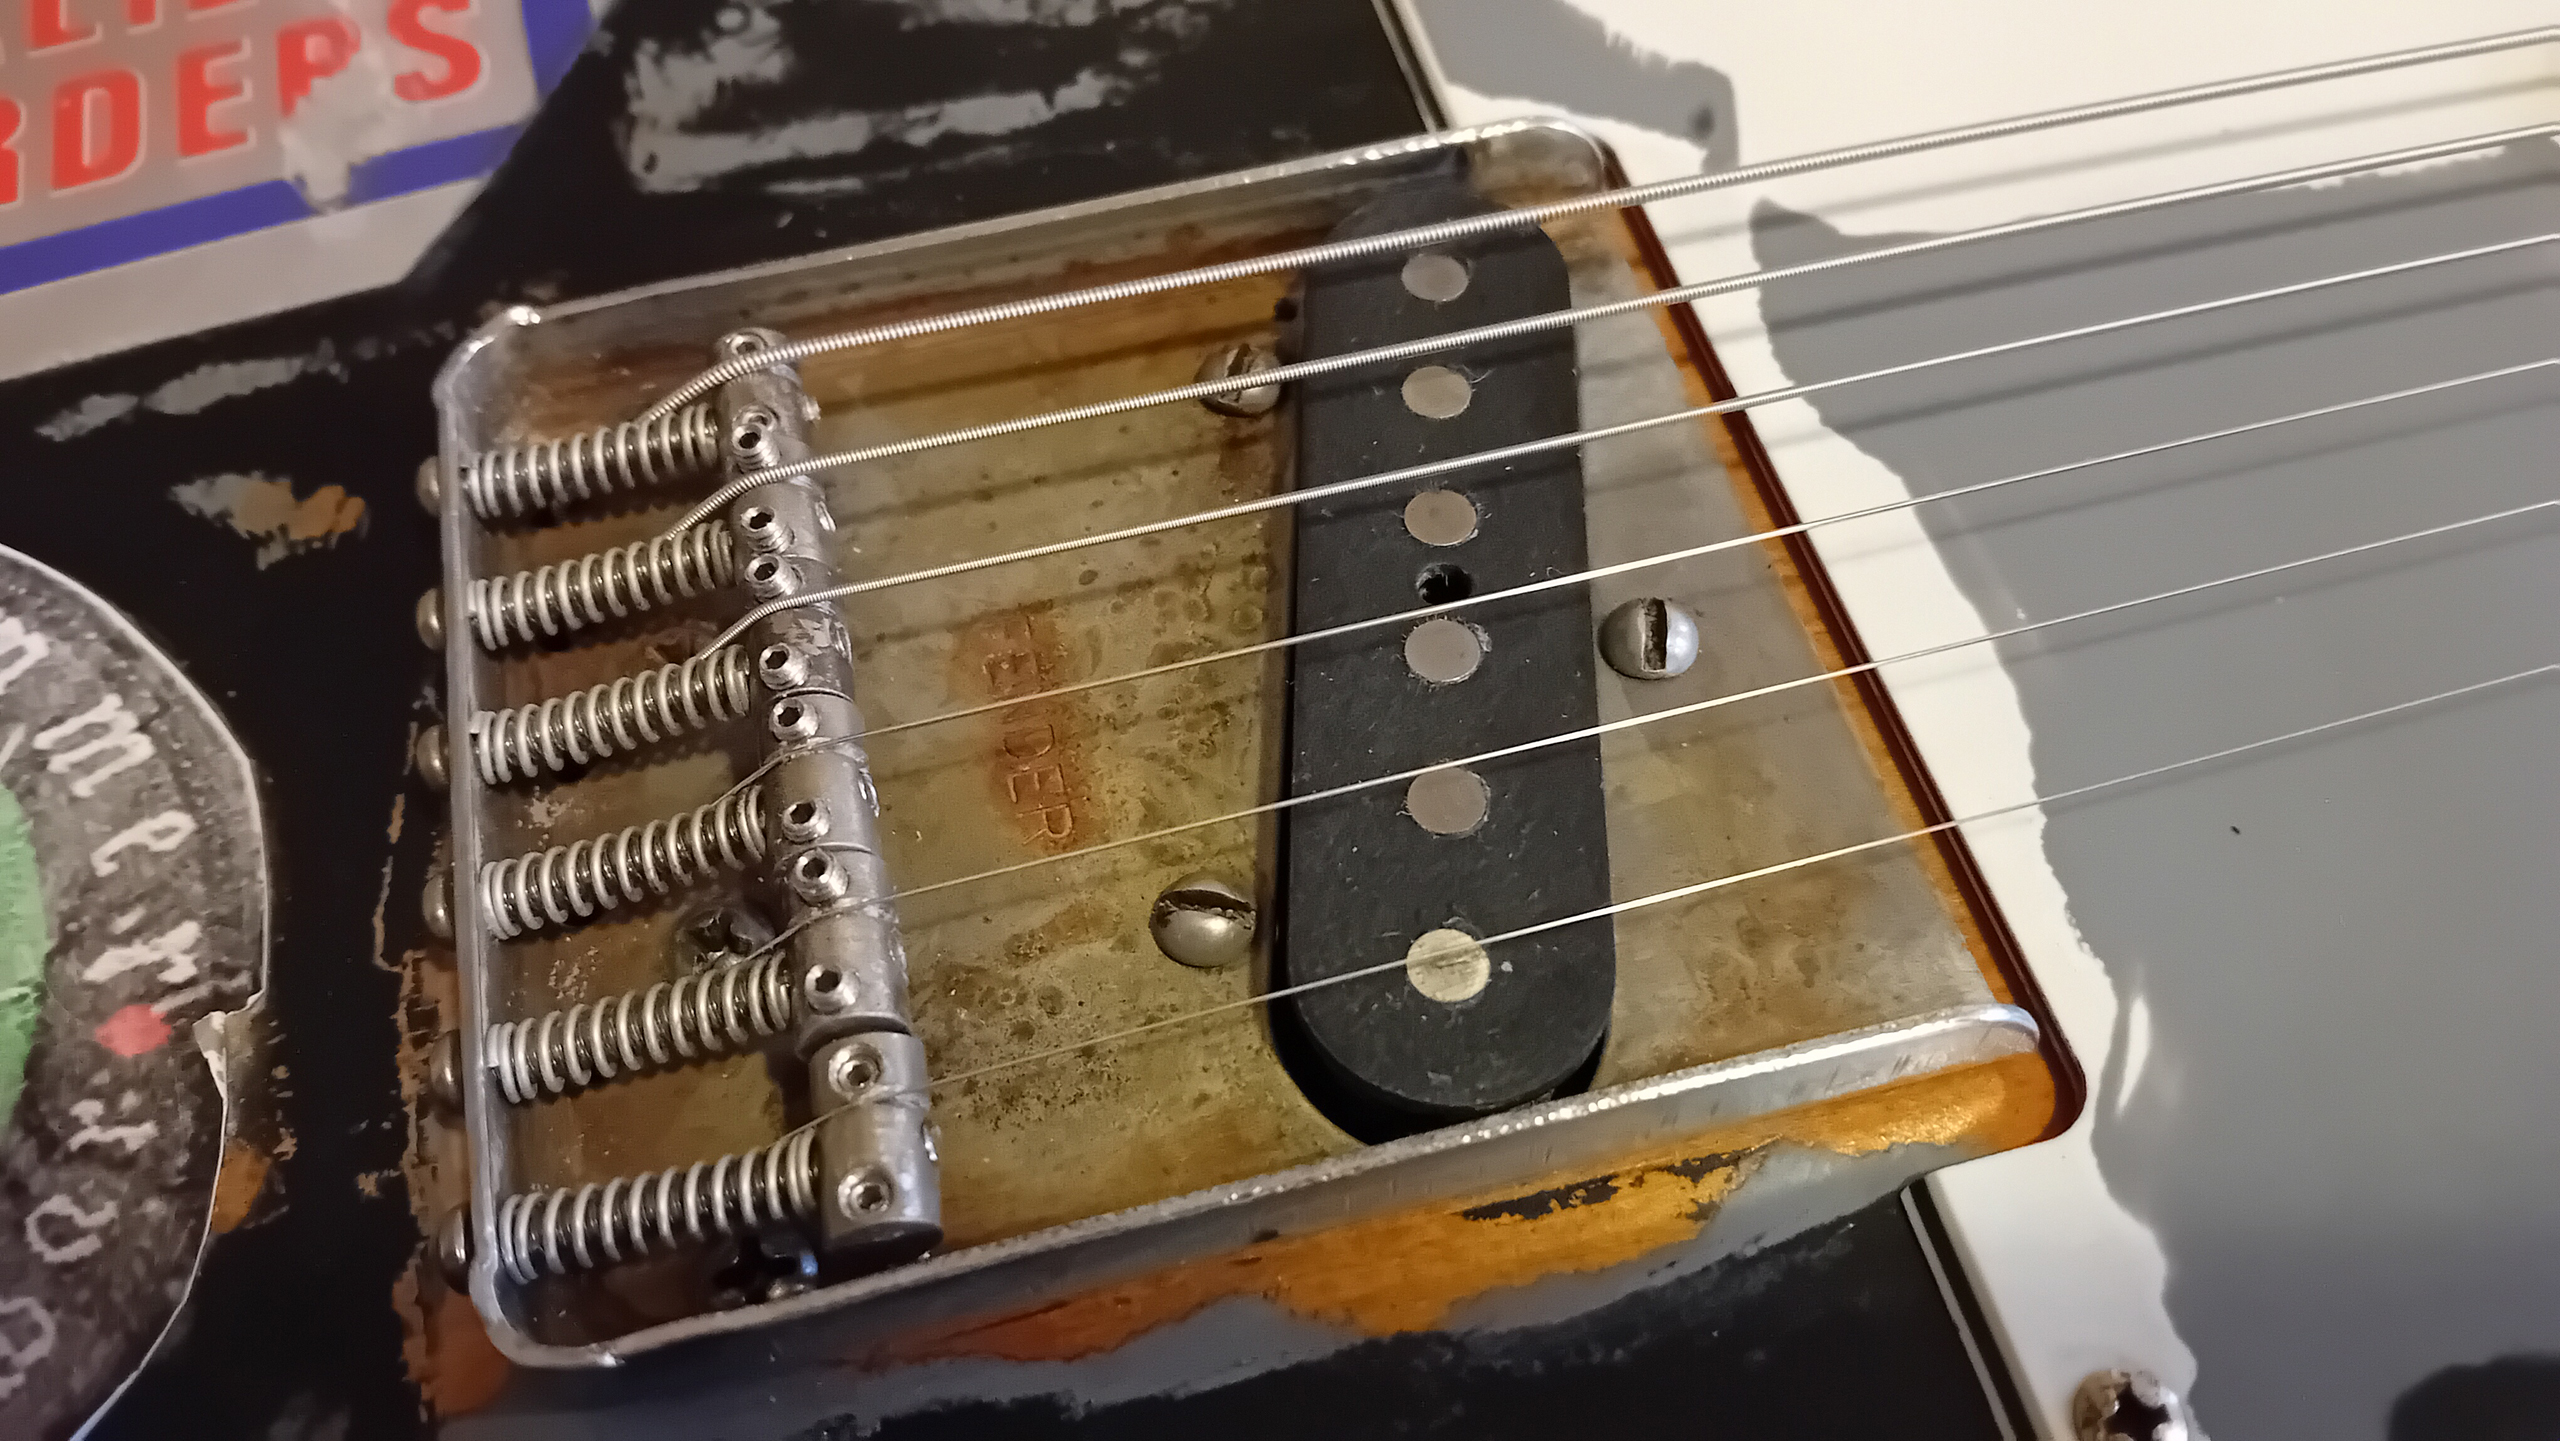
For the metal hardware – some was purchased “pre-reliced” – some was even bought “pre-owned” with opportunities to take advantage of “natural” wear and tear. (Why artificially age a brand-new component, if you can buy a used one for half the price, and the job of ageing it is already half-done for you?). Whenever I have to do ageing myself – metal components are usually lightly sanded with fine grit, or polishing pads, and then immersed in an etching solution, (Ferric Chloride), for just a few seconds. This begins to lightly “de-shine” the finish, and also opens up the surface metal to other sources of natural corrosion. After that – it’s often down to pure, (but controlled), neglect. Some components are wetted-down and left to rust up naturally, until they achieve the desired look. A few weeks in the garden shed does the trick…
But for performance-critical components – they’re only ever etched enough to reduce the shine. I don’t want to create areas of friction where strings touch, or any points of real, physical weakness. For screws and bolts – I only ever de-shine the exposed heads, and for the bridge saddles and springs – it’s the lightest possible etch, with all of the vulnerable grub screw holes plugged with wax. Once the metal has achieved the desired level of patina – Restoration or relic wax is used to protect the metal from further corrosion. In conjunction with a dusting of rottenstone, (ultra-fine rock dust) – the “dirt of ages” can be quickly and convincingly applied – even into all of the hard-to-reach, nooks and crannies. The intention is for the finished metal components to display “patination” – not necessarily just “corrosion“.
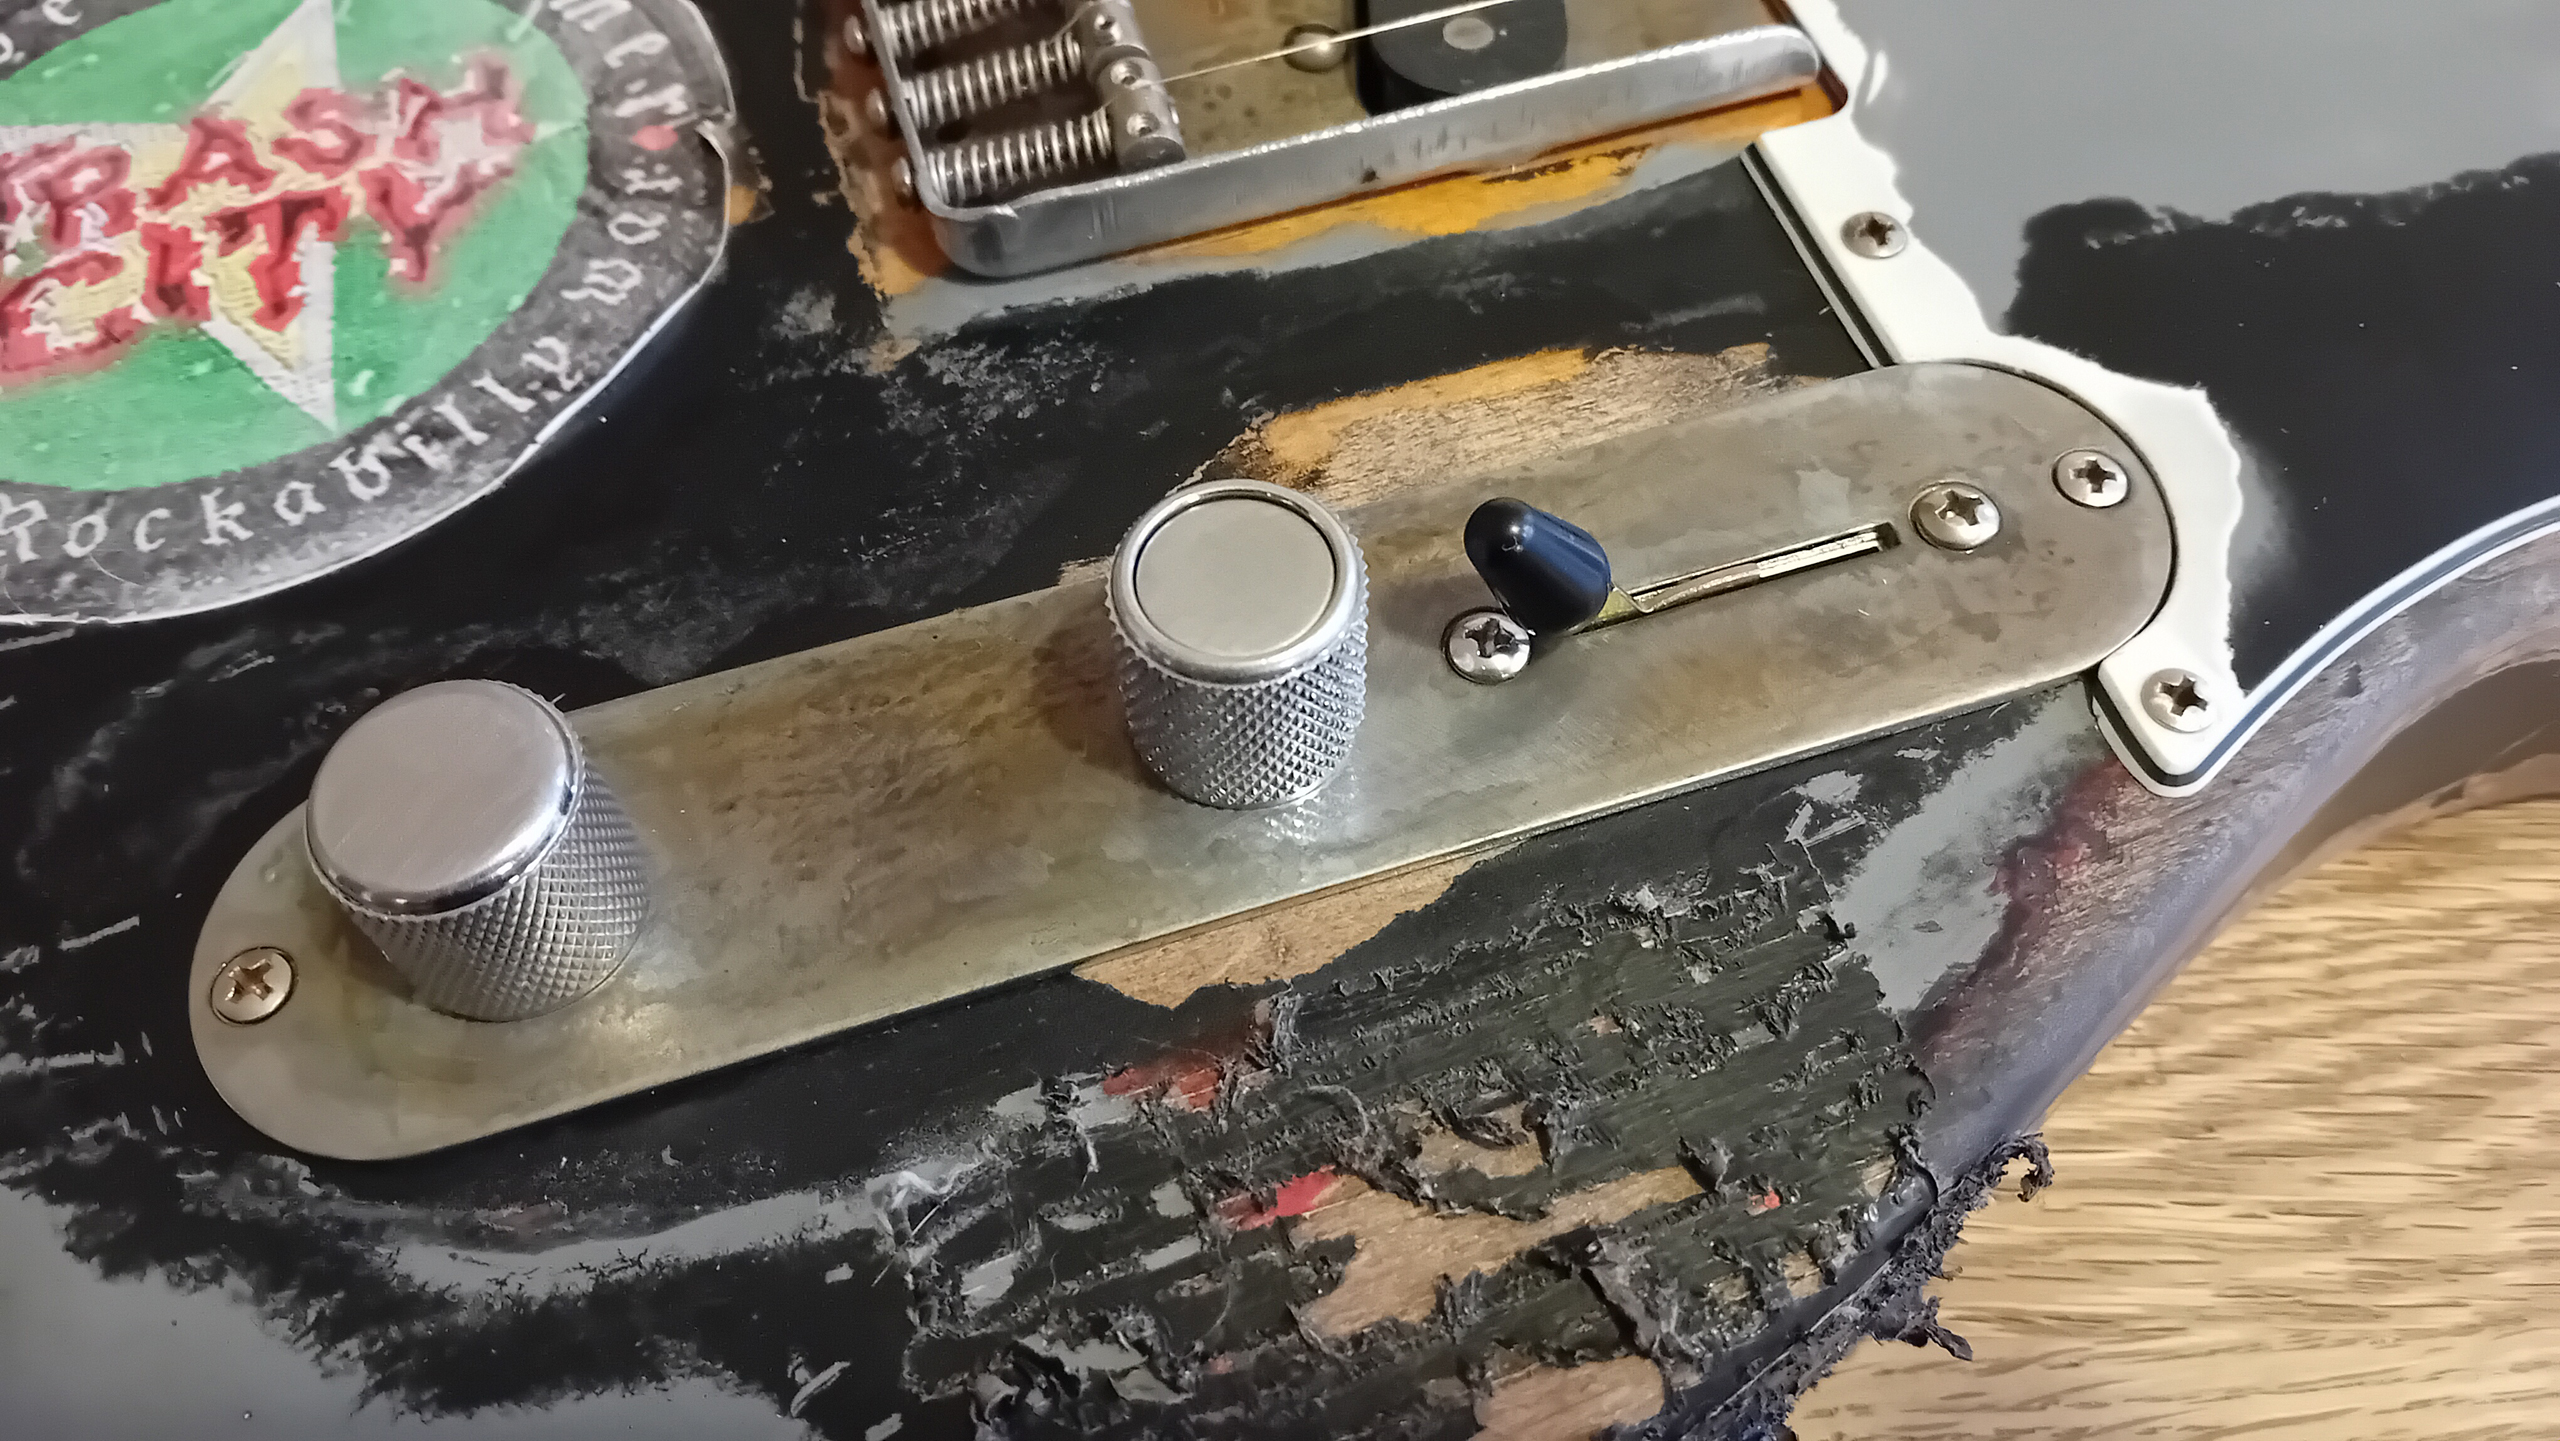
The neck and control plates were carefully selected – so that any artificial effects of ageing looked as consistent as possible with the bridge plate. Although the neck plate used was a genuine, (B-stock), Fender “F” plate – the control plate ended up as a generic, 34mm aftermarket item. There’s not that much difference in price or quality – but early tests showed that some genuine Fender control plates seem to age with less ferrous rust, and more copper verdigris when dunked in etch. (Presumably, different control plates have different base layers under the chrome). This particular reliced (Gotoh / Hosco?) plate matches well visually, with the, similarly aged, Fender bridge – (although the plate required a minor modification to accept US standard, CTS and Fender S-1 control pots. I also had to slightly enlarge the cutaway in the scratchplate, to accommodate it’s extra 2mm width).
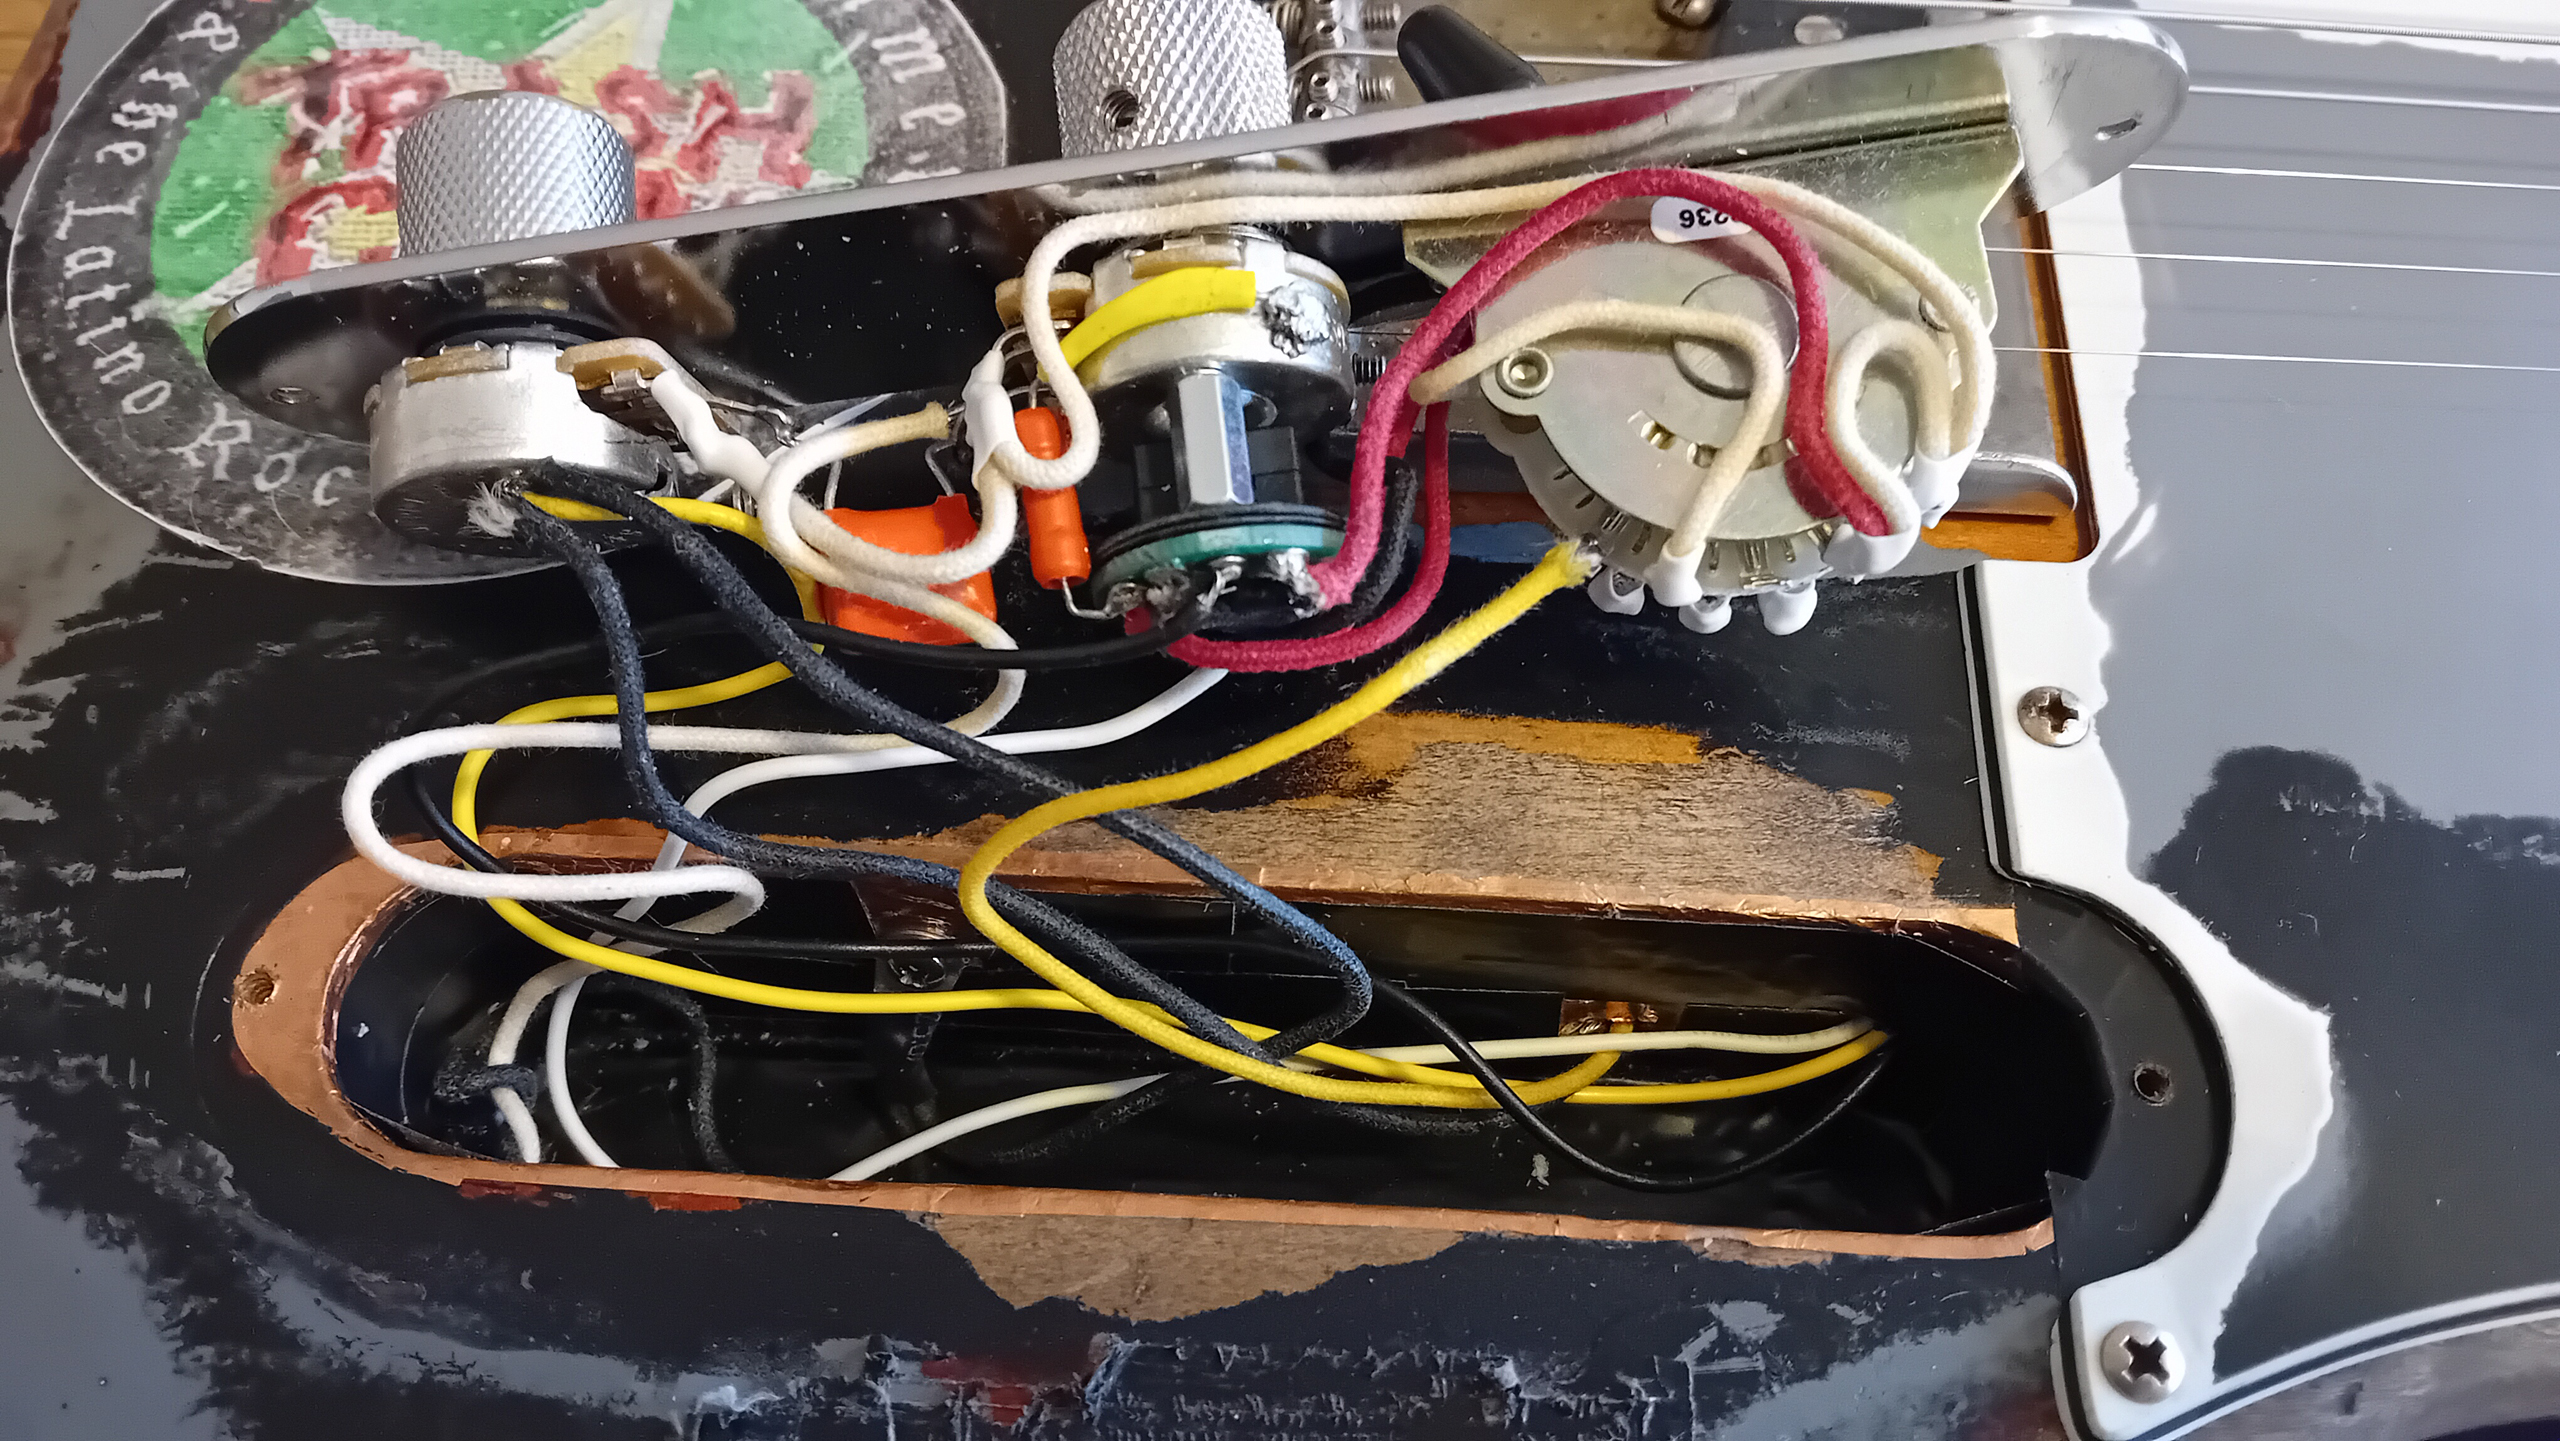
Underneath the control plate – the tone circuit was built to replicate a Fender “Baja” schematic, with a Fender S-1 switch at the heart of operations. Quality components throughout – with some “Gavitt” cloth-covered “push-back” wire, Sprague and Cornell Dubillier “Orange Drop” caps, and an Oak Grigsby 4-way sprung switch. Circuit terminal connections were, by and large, reinforced and insulated with shrink tubing wherever possible. All cavities were shielded with thick copper adhesive foil – with a layer of electrical insulation tape over the top. All of the ground wires run to a central “star” ground point, which is connected direct to the output socket. (Itself a strengthened, aftermarket patch-plate type). This configuration shields all internal wiring from external EM interference, and the additional insulation will prevent accidental shorts to ground, by holding wires in place at the terminals and stopping any loose wiring, (should it ever develop), from moving about and accidentally coming into contact with the, (grounded), sides of the cavities.
To further facilitate the desired “Baja” tone and functionality – pickups were selected accordingly. A new Fender “Custom Shop” “Twisted Tele” neck pickup, was wired with a separate ground lead for the metal “lipstick” cover shield. This is important for the correct operation of the S-1 phase switching, and it opens up possibilites to accommodate all kinds of alternative bridge pickups, in the future. With the TT neck pickup in place – pretty much any bridge pickup can now be selected and paired – with any, unexpected, “out of phase” effects resolved – by simply switching the signal leads at the S-1 switch. Depending on the coil slug polarity directions – “hum-cancellation” benefits may, possibly, be sacrificed – but the extensive copper shielding should always compensate for any defecits in that regard. During testing – even 12 linear feet of nearby LED lighting – (normally a sure-fire way to instill, at least, a little background hum) – failed to create any interference or noise in the circuit at all. The only noticeable sound in operation, is a slight click when the inner S-1 switch is depressed. Otherwise – the “Baja” circuit works well – and it offers a much wider range of tonal possibilities than the standard Telecaster schematic. (Although you have to spot the deliberate mistake in the Fender service diagram first… There needs to be an additional wire, grounding the tone capacitor and the “output” lug of the S-1″ against the pot housing. With the circuit as drawn by Fender – the volume knob doesn’t function at all. (Fender spec 014-1502 / 7-18-2006 Rev. A)).
The usual “Baja” pickup set usually has a Fender “Broadcaster” bridge pickup, paired with the TT neck – but new Broadcasters aren’t available any more. The matching bridge supplied with the TT set is a little too overwound… a little too “modern” sounding perhaps – (Joe’s sound came from authentic vintage Fender pickups, mostly played “clean” through a loud MusicMan amp). A modern Fender ’64 might do the trick?.. (It still remains a possible alternative for investigation…) However – eventually, and after reading through the usual online discussions – I opted for a Fender Custom Shop “NoCaster ’51” bridge pickup. The ’51 is – to me – probably one of the most “Telecaster” sounding Fender pickups I’ve come across. (And it’s also currently still in production). The apple doesn’t fall far from the tree, and although it is a modern Fender pickup, which aims to reproduce the authentic vintage sound – and is, perhaps, a little underwound compared with some alternatives and competitors – it has all of the characteristic twang snap and bark to complement the type of percussive playing it’s going to get in spades. As I hit the first chord after setting-up… I just thought to myself… “Yep… Tele’“. If it doesn’t suit for it’s intended job – I’m more than happy to swap it out, and use it on another of my own builds. Even if I don’t see it again – I’m more than likely to pick up a few more of these, before Fender stop making them.

Body complete and reliced – and with the detail adjusted to evoke as much of the character of the original as possible – both in terms of looks and the sound it creates – the guitar body finally has to match with a suitable neck, to become a finished, playable instrument. As I’ve written before – in this case – the choice of neck was much more about “personal choice and playability” than any specific, reliced “look“. A darker (rosewood) fingerboard would have been more in-keeping from a cosmetic point of view – but Fender continues to commit to Pau Ferro, (at least for it’s more realistically-priced lines). So it’s a balance – yet again – between that “authenticity” issue… what you’re used to playing… what’s available now… and how much it can be had for.
Ultimately – the final decision was left hanging, for “something suitable to turn up“. With a notional completion deadline set around mid-February – and the days quickly running out – this “fitted but never played” 2021 Fender Player Telecaster neck is just what happened to turn up… Happily – it turns out that it’s just what was required. There are plenty of “open box” or “second thoughts..” necks out there, (necks from builders like myself, who often buy something… fit it… and then change their minds). These are a good opportunity to save – and since the possibility still remains, that a different, (better), second-hand, rosewood neck might, one day, fall into our laps in a similar way… For now – this happens to fit the (playability) bill exactly – with the complete cost, (with additional tuners), even falling just slightly below the anticipated budget.
The neck feels great to play – with absolutely no additional work required on the frets. It does have an additional, (22nd), “overhanging” fret – which makes the removal of the pickguard impossible, without loosening the neck entirely – but that neck pickup is screwed down tight into it’s cavity – and I can’t see it’ll ever need adjusting from where it is. The current neck reportedly plays well – “…like an old favourite – I can’t put it down…“. I’m pretty sure, if a suitable replacement rosewood neck ever does come up – this existing one will be moved on to another guitar, and used well there.
After completing the build and setting it up with a stock, “vanilla” Fender action – the finished guitar certainly raises a smile here and, as I say – “it certainly sounds like a Tele“. Joe tells me that he’s often asked about it after gigs. (Clearly – it has the impact, which was intended and desired). But, then – if you want to gauge the suitability and playability yourself… how well the guitar “hits the spot” as regards authenticity and original intent – you’d probably be better off seeing and hearing it in action…
